Compass Learn & Support
Find practical help for setting up Compass, adding plans or logs, checking coverage, using Plus features, and generating reports.
Add classes or subjects
Add or manage the classes, subjects, grades, and curriculum sources you want to track.
Open guide →Add what you planned or taught
Use Add Plan for planning records, or Quick Log when you just need to record what happened.
Open guide →Check coverage and reports
See what is To Do, Planned, or Taught, then generate a clean record when needed.
Open guide →Getting Started
6 guidesWhat is Compass?
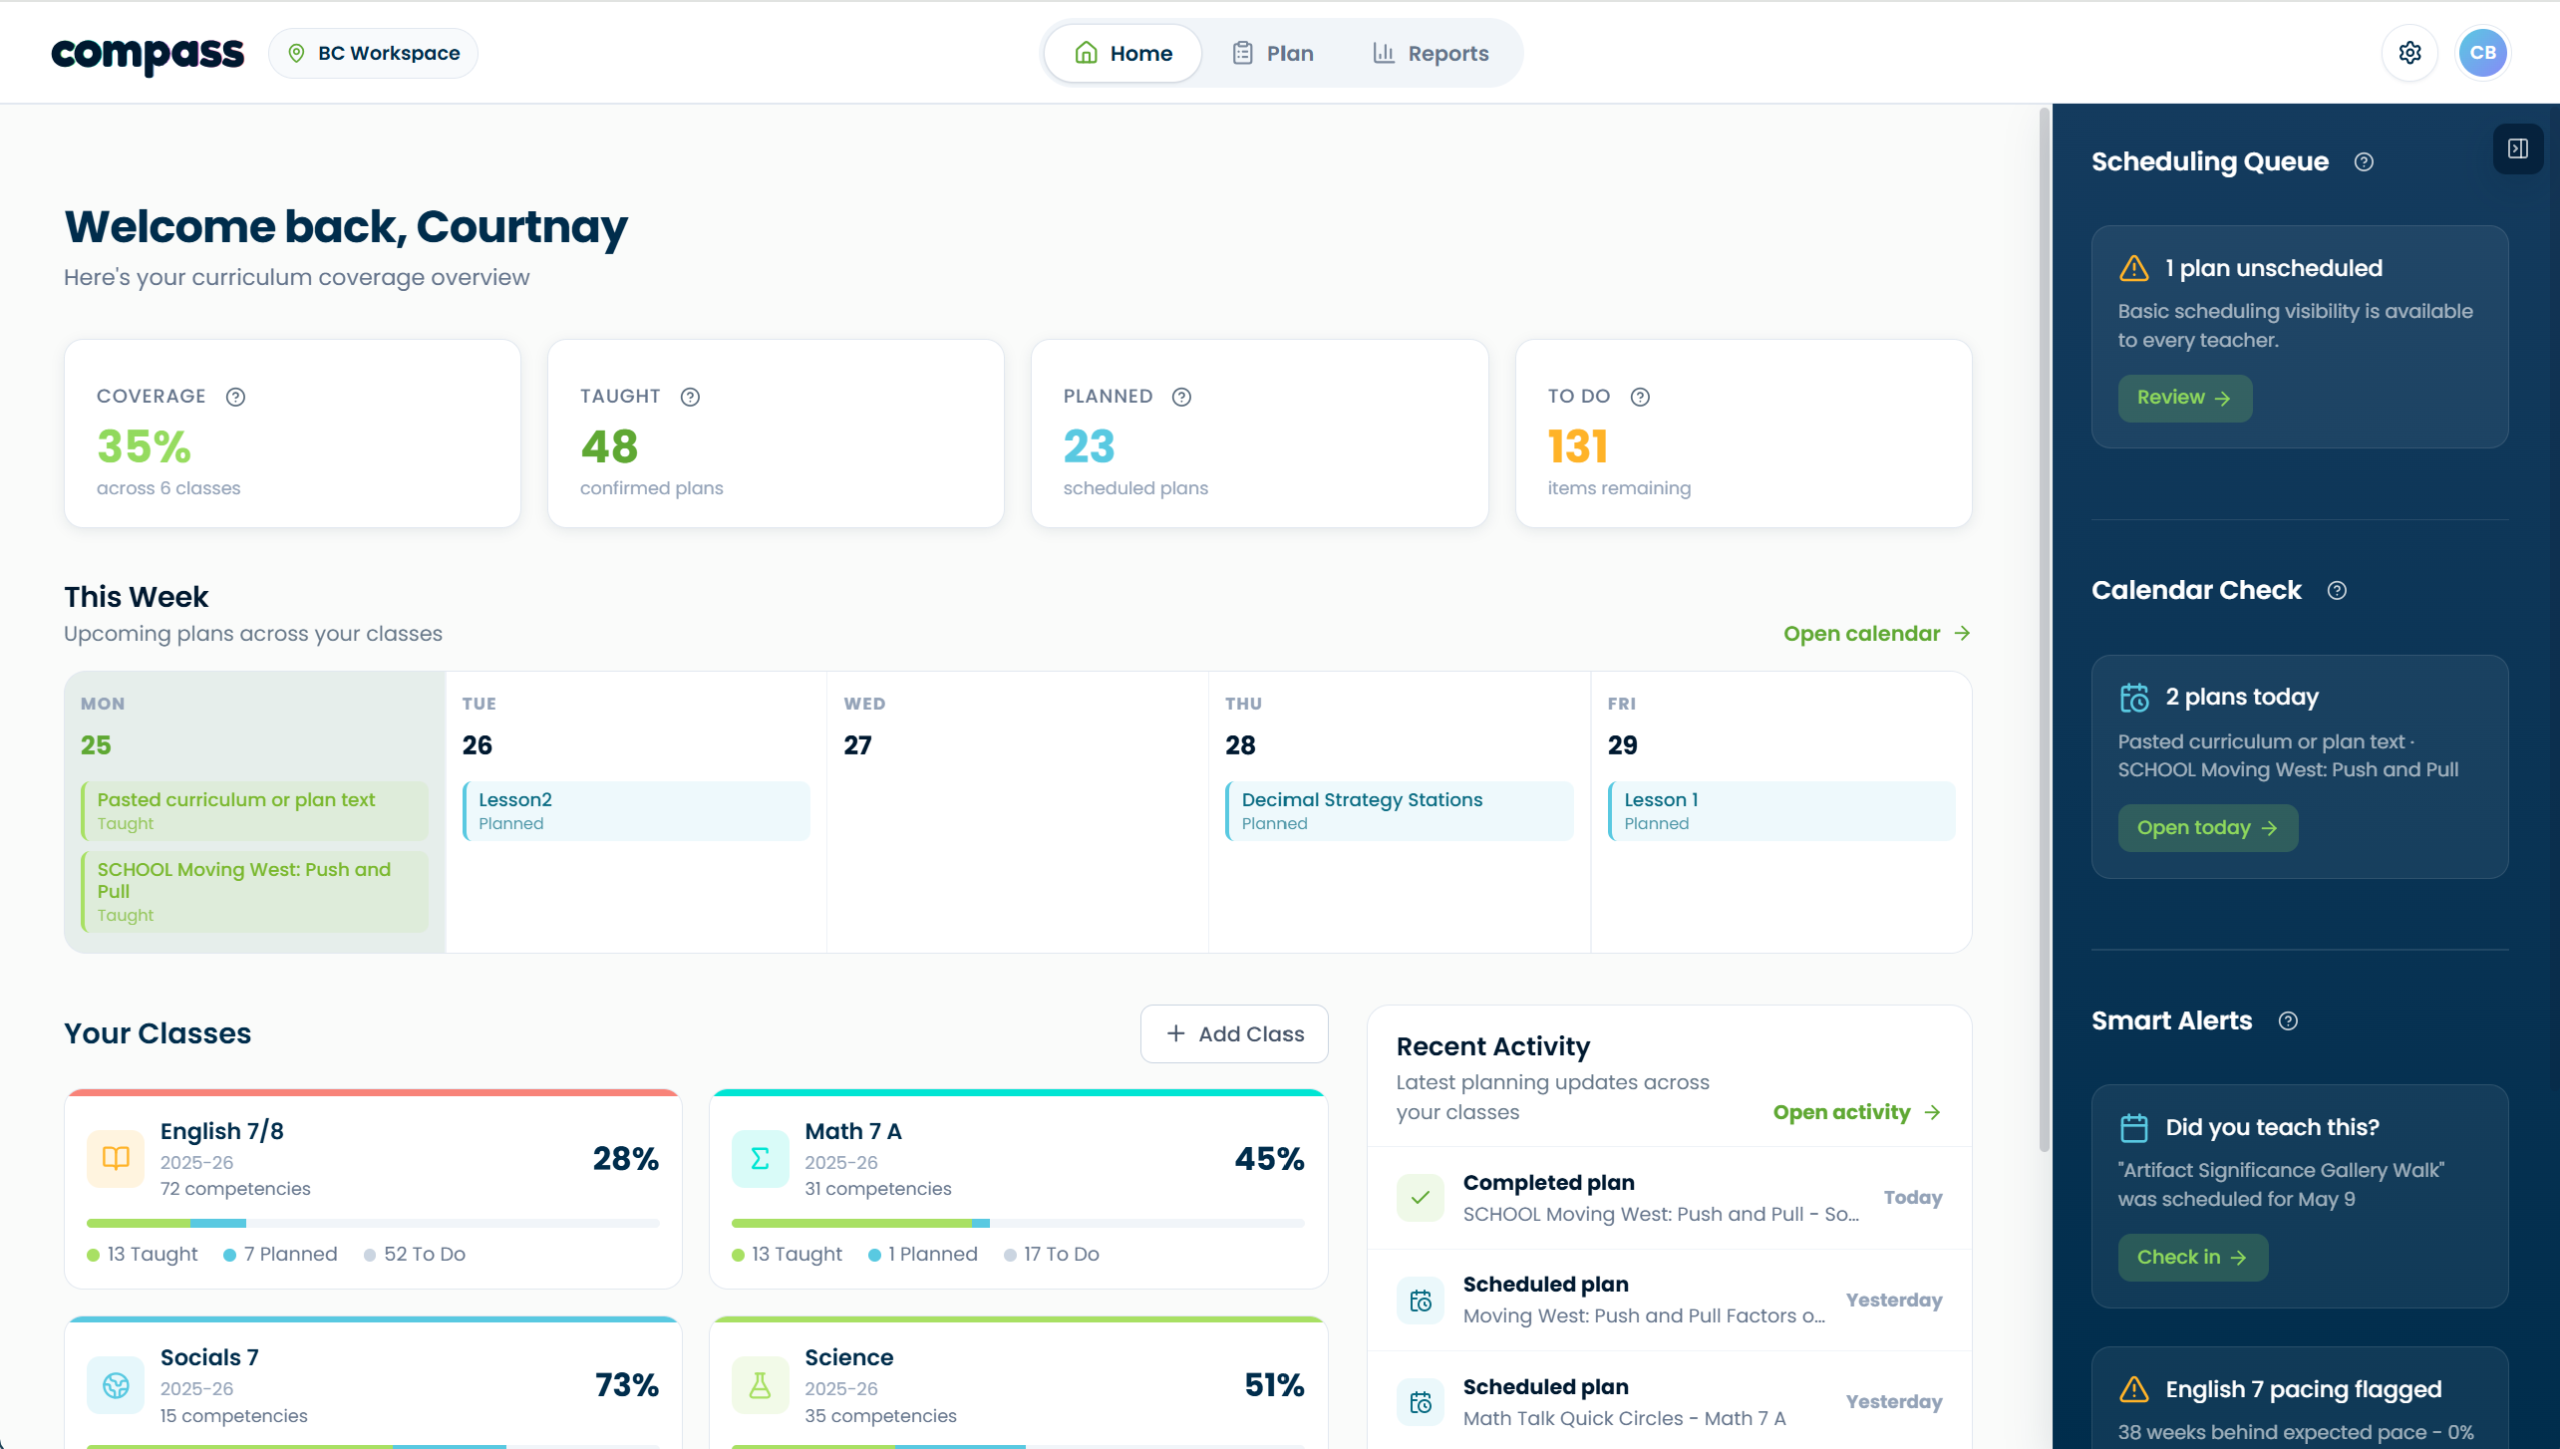
Compass helps teachers track curriculum coverage across planned and taught work. It shows what has been taught, what is scheduled, and what still needs attention.
What Compass helps with
Visual reference
Do I need CARL to use Compass?
No. Compass is part of the CARL family of teacher tools, but you do not need CARL lesson planning to use Compass.
Future integration will make it easier to move between Compass coverage needs and CARL planning support.
What’s the difference between Free and Plus?
Free includes the core tracking workflow. Plus adds Smart Scan, Plan Ideas, and extra reports.
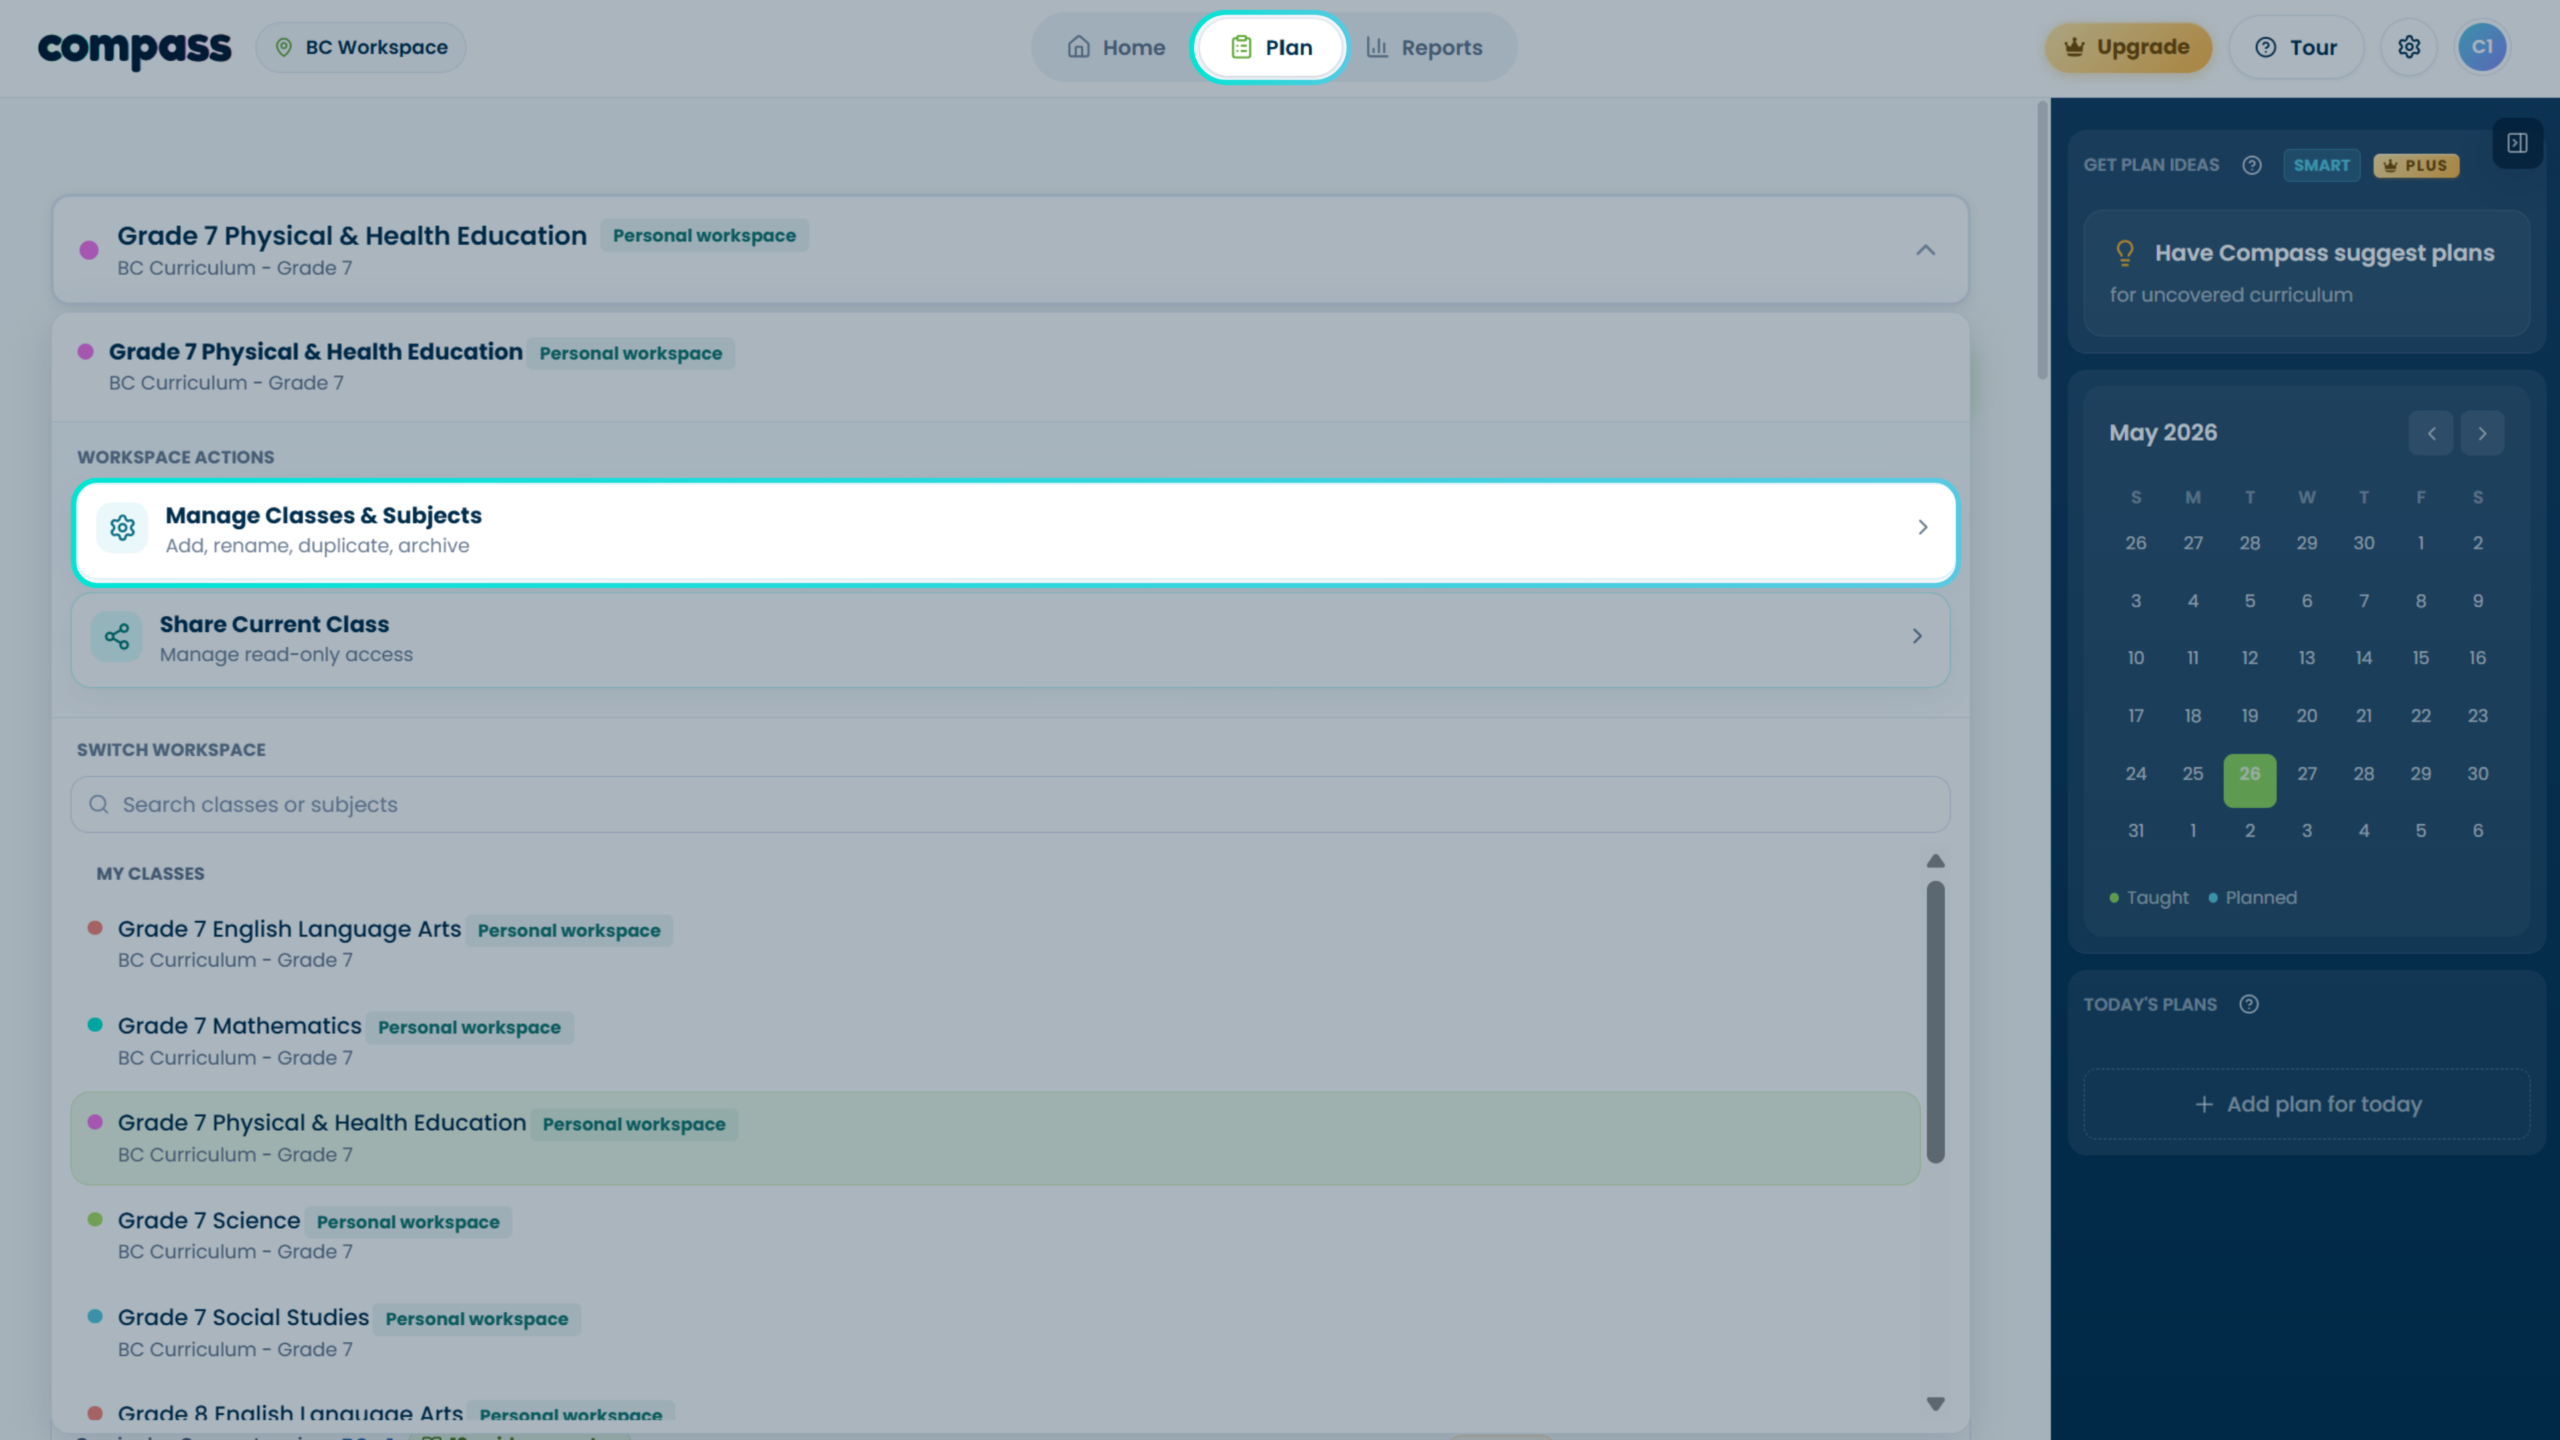
How do I add classes or subjects?
Use Manage Classes & Subjects to add or adjust the classes, subjects, grades, and curriculum sources you want to track.
When to use this
Use this guide when you are setting up Compass for the first time, adding another class or subject, or adjusting a class after setup.
Basic steps
- Start with your curriculum context. During first setup, choose your province or curriculum source, then choose your subjects and grades.
- Confirm what levels Compass should track. Levels 3 and 4 are selected by default. Levels 1 and 2 are reference/context levels unless you choose otherwise.
- Create your first workspace. Compass creates the first class or subject workspace from your setup choices.
- Add more later. Open Manage Classes & Subjects from the Plan page subject selector or from Settings.
- Review, rename, duplicate, archive, or add sections. The management screen is where class and subject admin actions belong.
Visual walkthrough
What are tracking levels?
Tracking levels are the layers of the curriculum hierarchy. Levels 3 and 4 can count toward coverage. Levels 1 and 2 are shown as reference/context unless otherwise enabled.
What are guidance notes?
Guidance notes are reference information connected to a curriculum item. They help teachers understand a standard, but they are not tracked as coverage items.
Guidance notes may include official notes, examples, clarifications, or supporting context. They are helpful for teacher understanding, but they do not count as separate coverage items.
Plan Workspace
5 guidesHow do To Do, Planned, and Taught work?
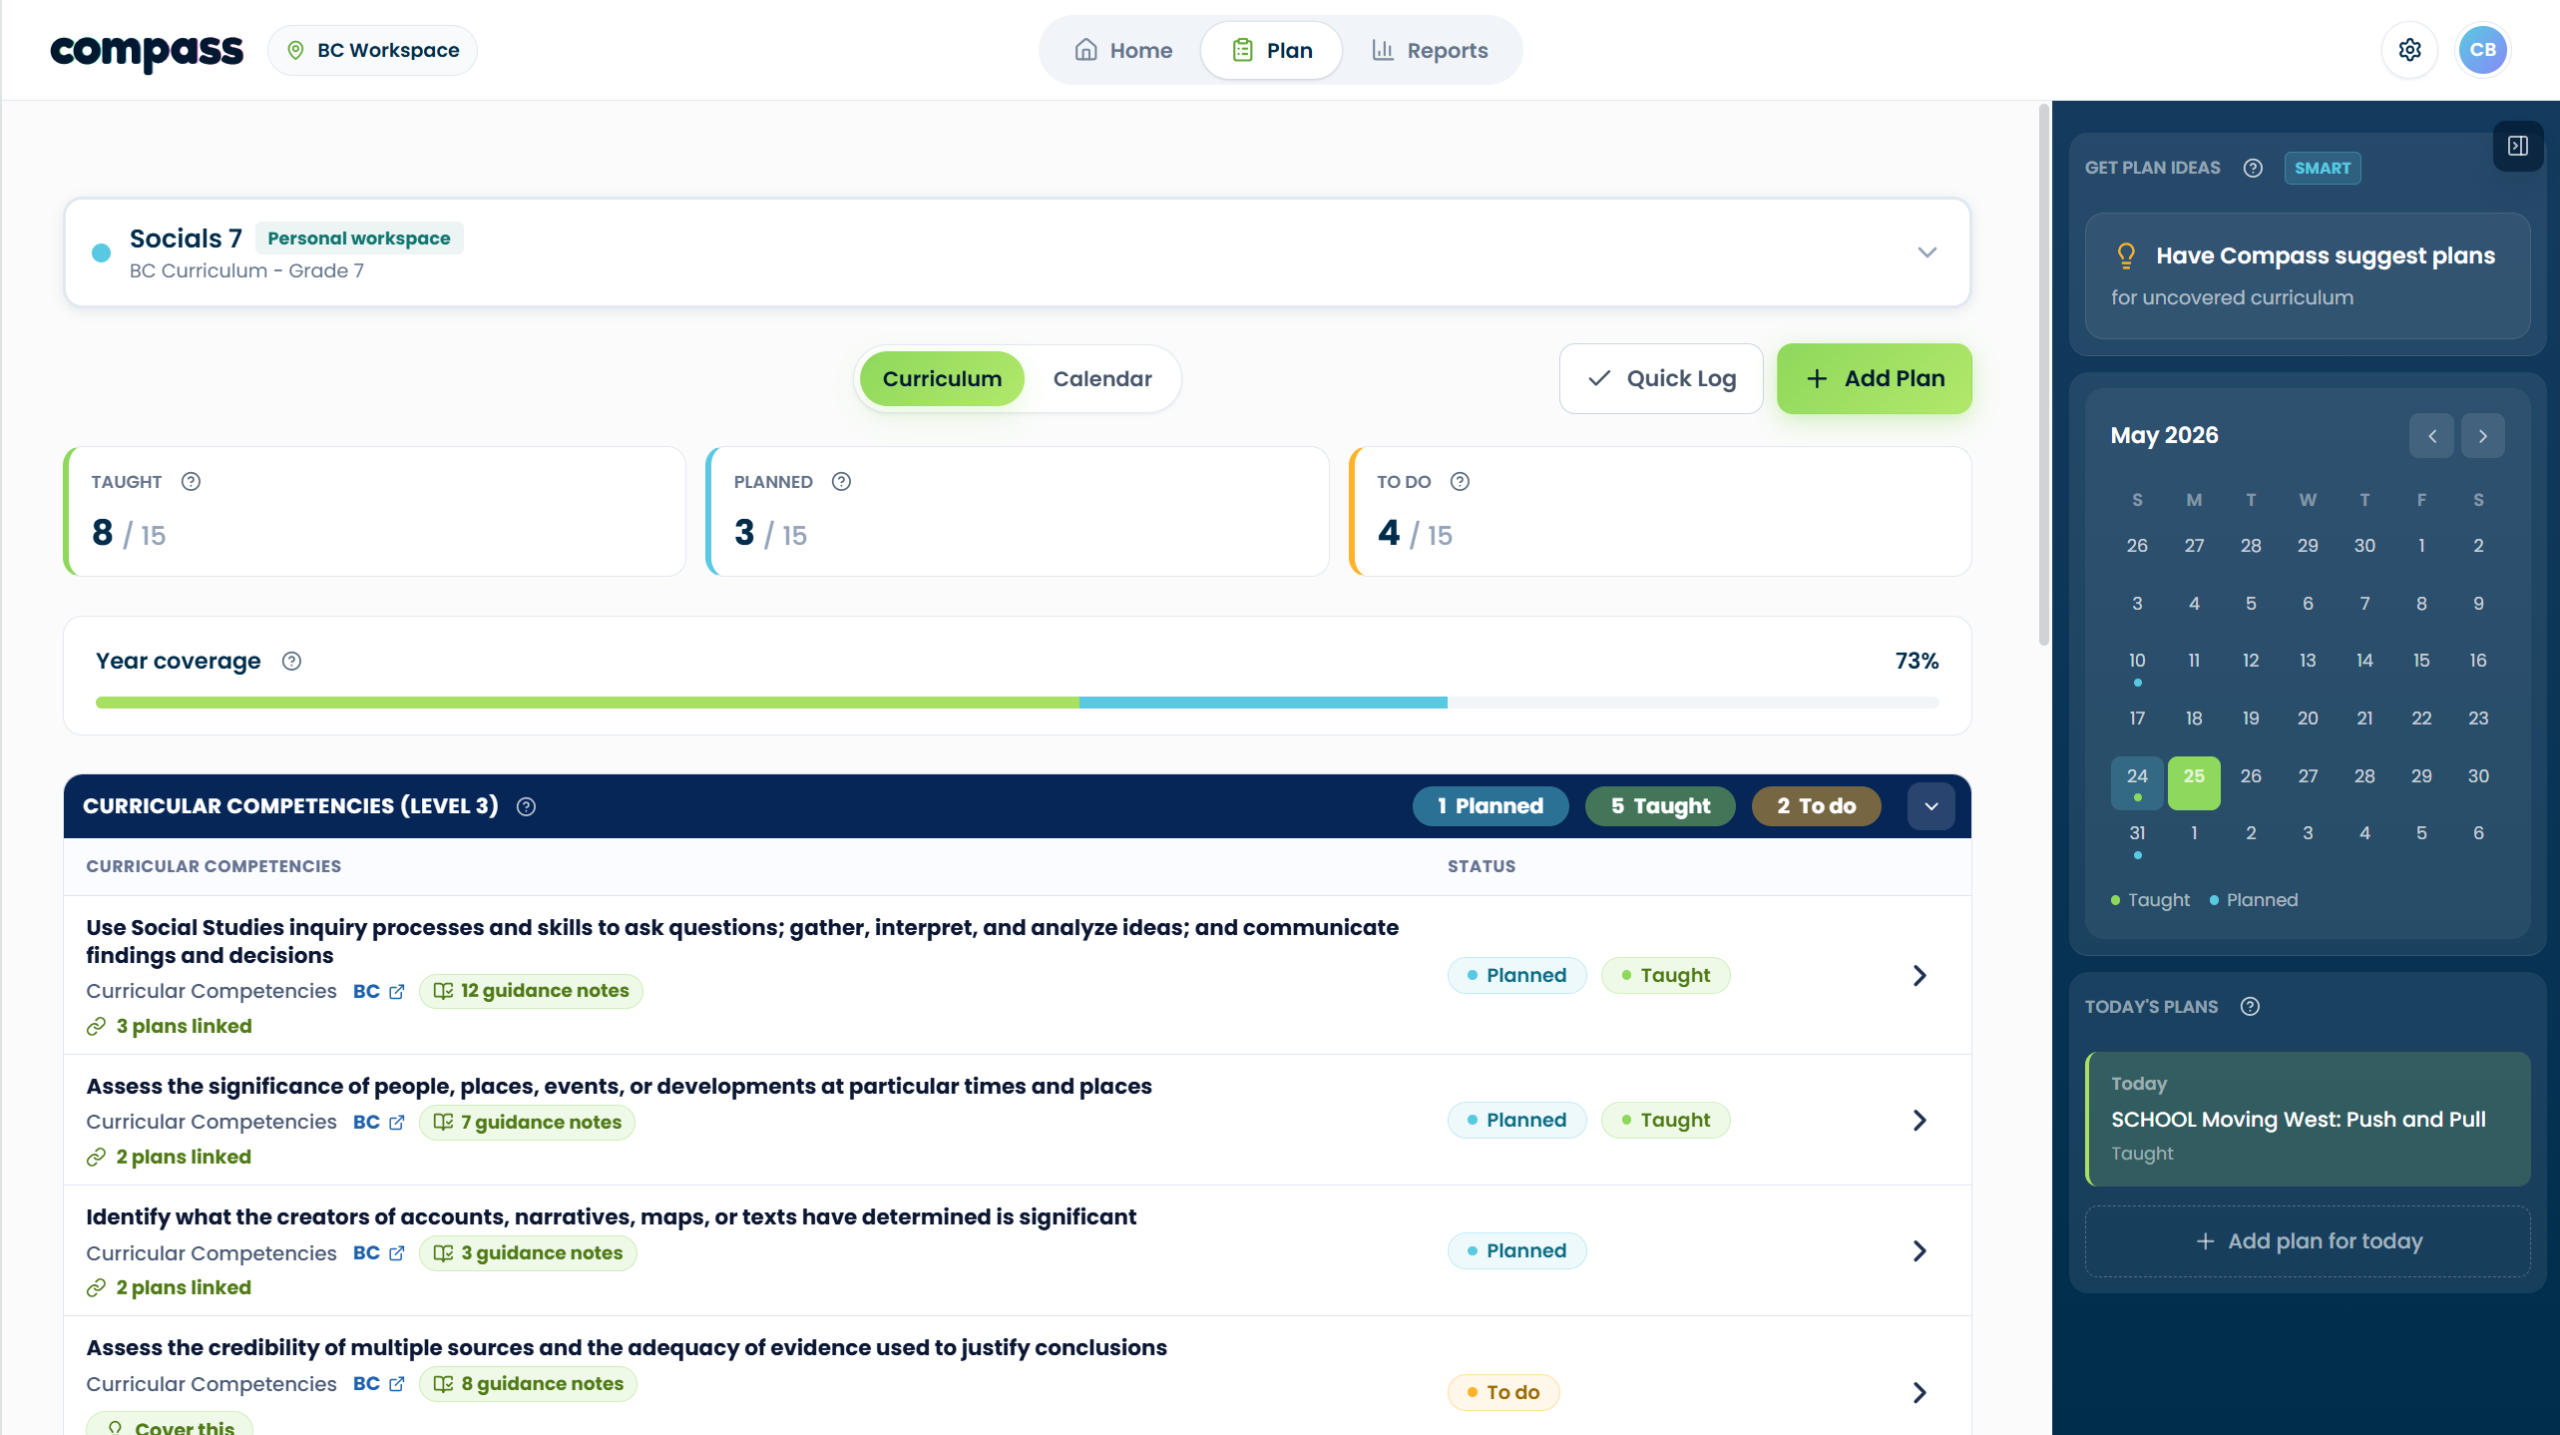
To Do, Planned, and Taught show where each curriculum item sits in your coverage workflow.
Status meanings
Coverage priority
- Taught comes first. If at least one confirmed active plan is marked Taught, the item shows as Taught.
- Planned comes next. If there is no taught plan but there is a dated confirmed plan, the item shows as Planned.
- Everything else stays To Do. Unscheduled or unconfirmed matches do not count until the teacher reviews and confirms them.
Visual reference
How do I add a plan?
Use Add Plan when you want to add something you are planning, have already taught, or want to save for later.
Choose the right path
Basic steps
- Open Add Plan from the Plan page. Choose the method that matches what you have.
- Add the plan details. Include a title, class or subject, optional notes, and the status you want to use.
- Choose curriculum manually or review Smart Scan suggestions. Nothing counts until the teacher confirms it.
- Save as Planned, Taught, or saved for later. Dated Planned/Taught records update the coverage view.
Visual reference
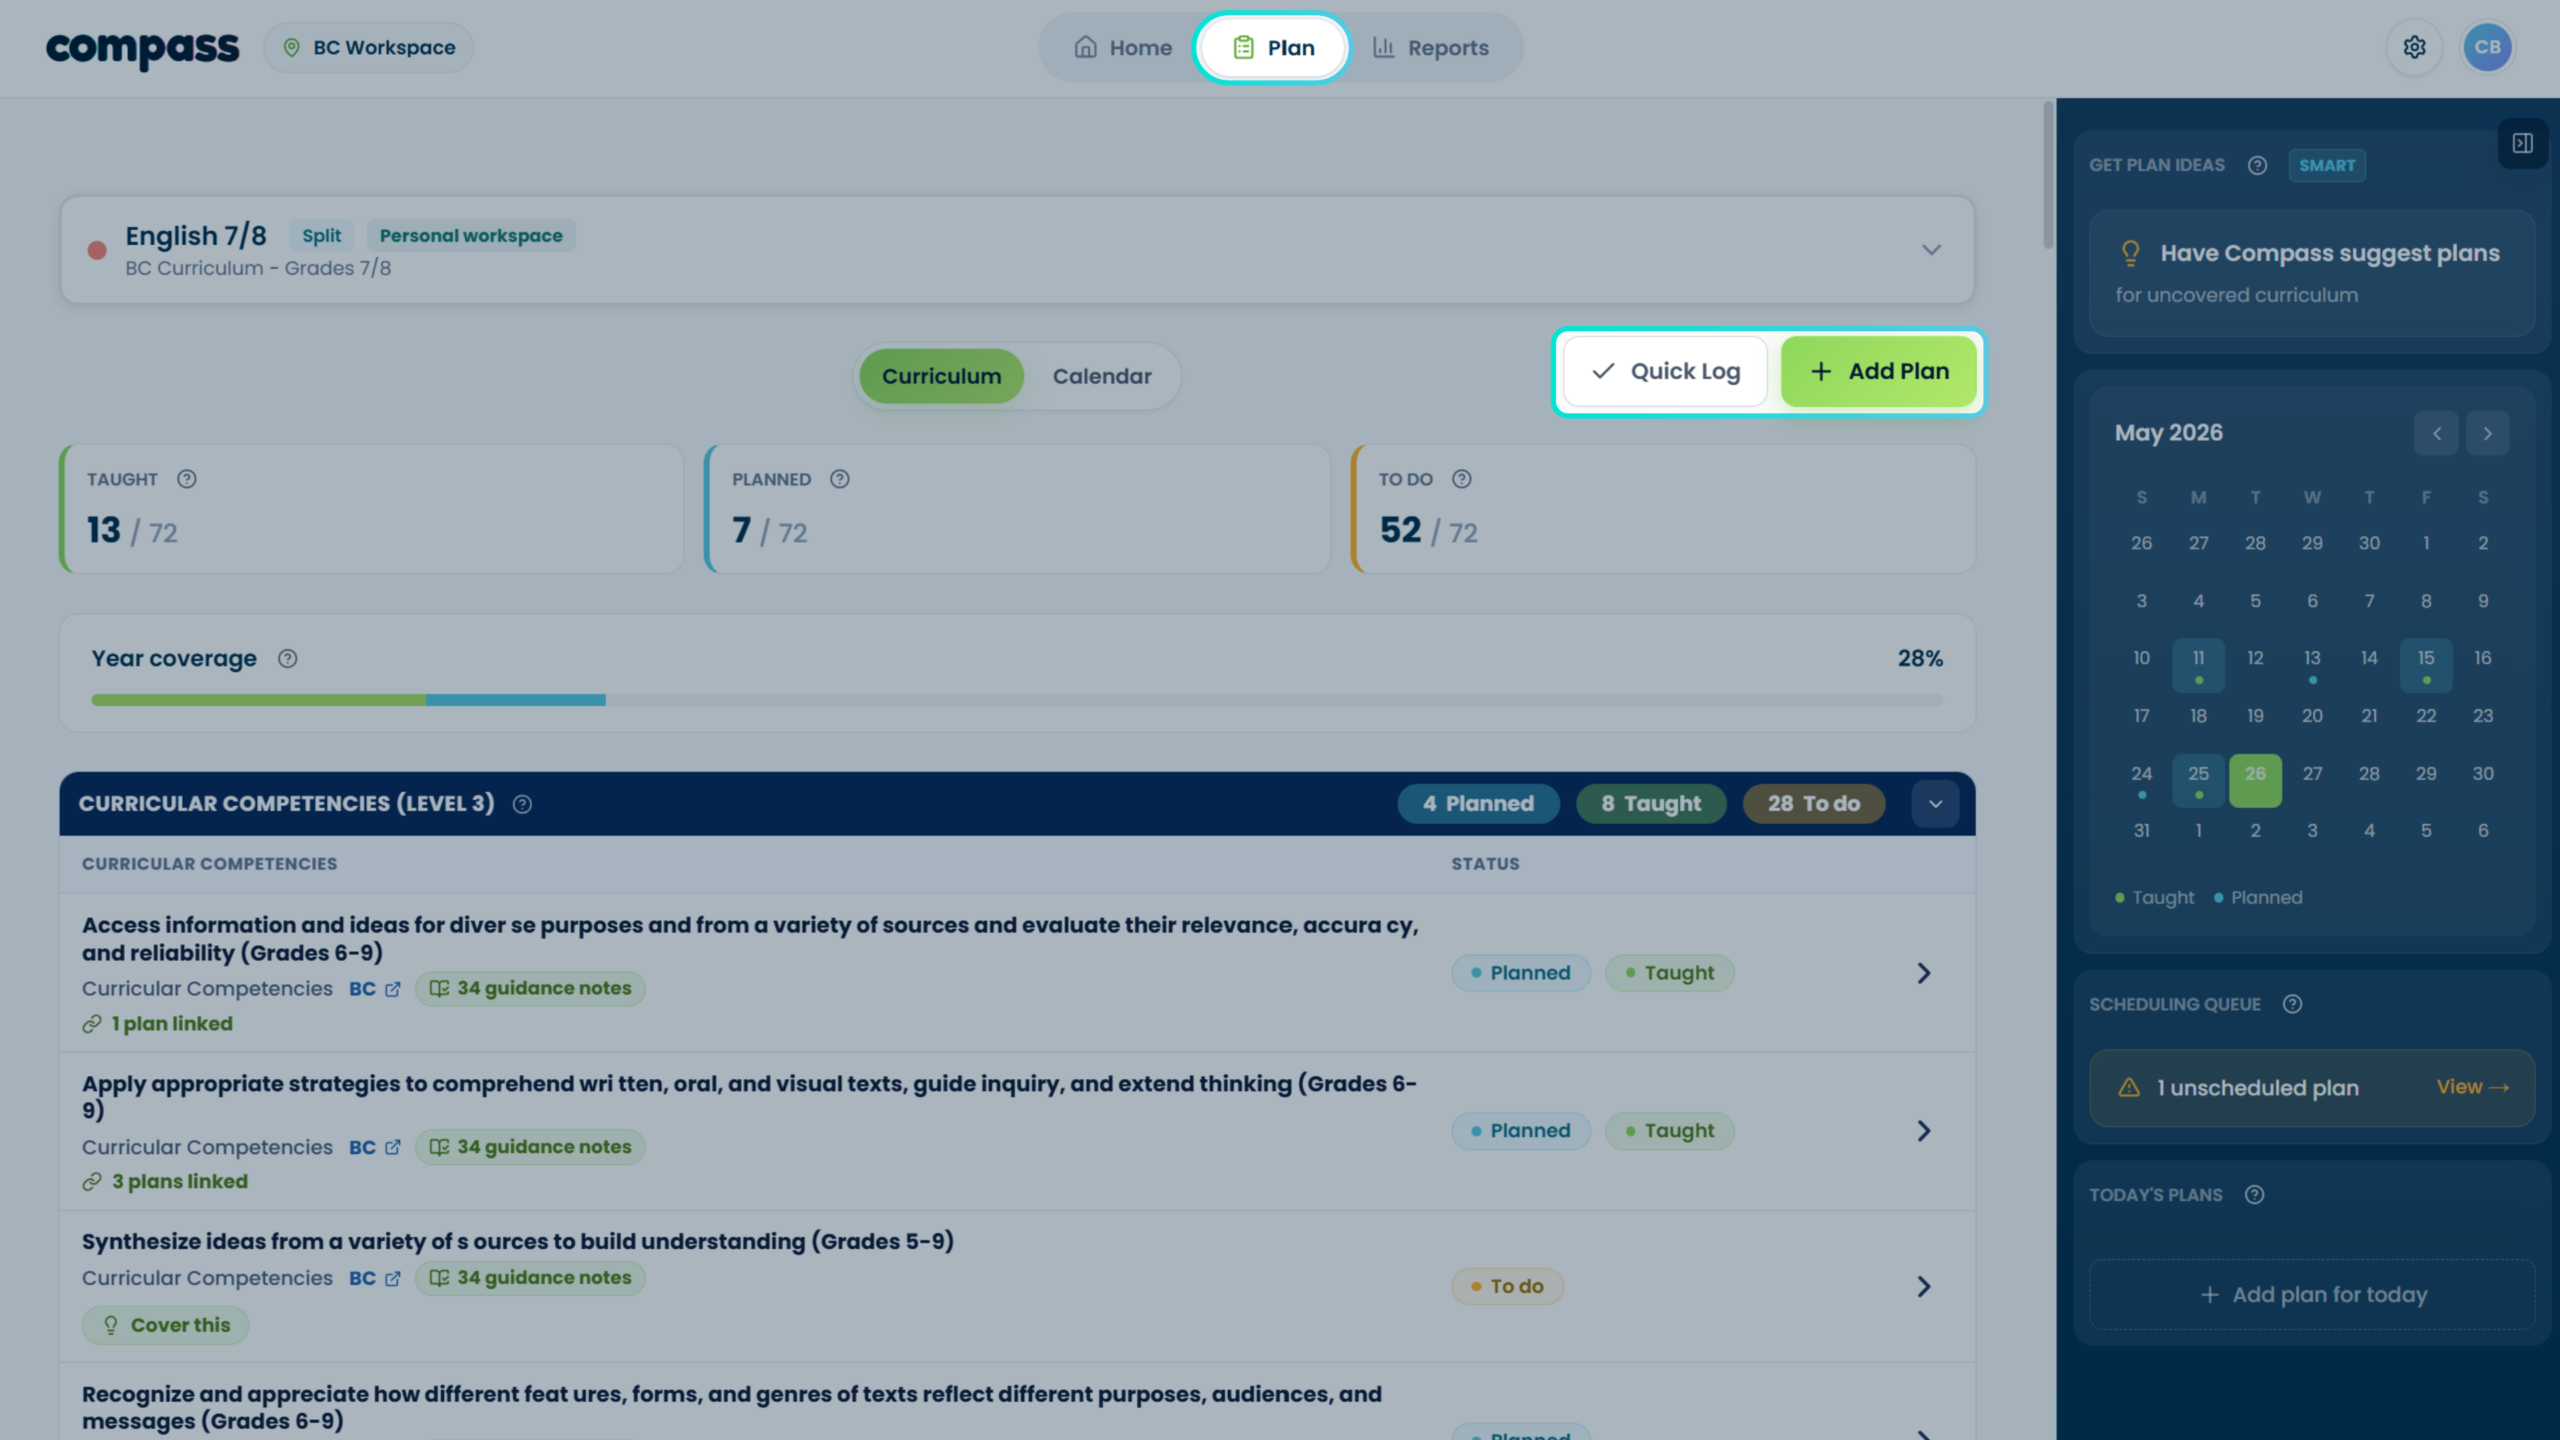
How do I use Quick Log?
Quick Log is the fastest way to add a teaching record.
When to use Quick Log
Use Quick Log when you do not need to upload a plan or write a detailed record. It is designed for quick coverage logging.
Basic steps
- Open Quick Log from the Plan page. This opens the fast entry workflow.
- Select what you covered. Choose the curriculum items connected to the lesson or activity.
- Choose when it happened. Use Today, Yesterday, or pick a date.
- Add an optional title or note. Keep it short. The goal is a useful teaching record, not a full lesson plan.
- Save the log. The selected items can update the coverage view once confirmed.
Visual walkthrough
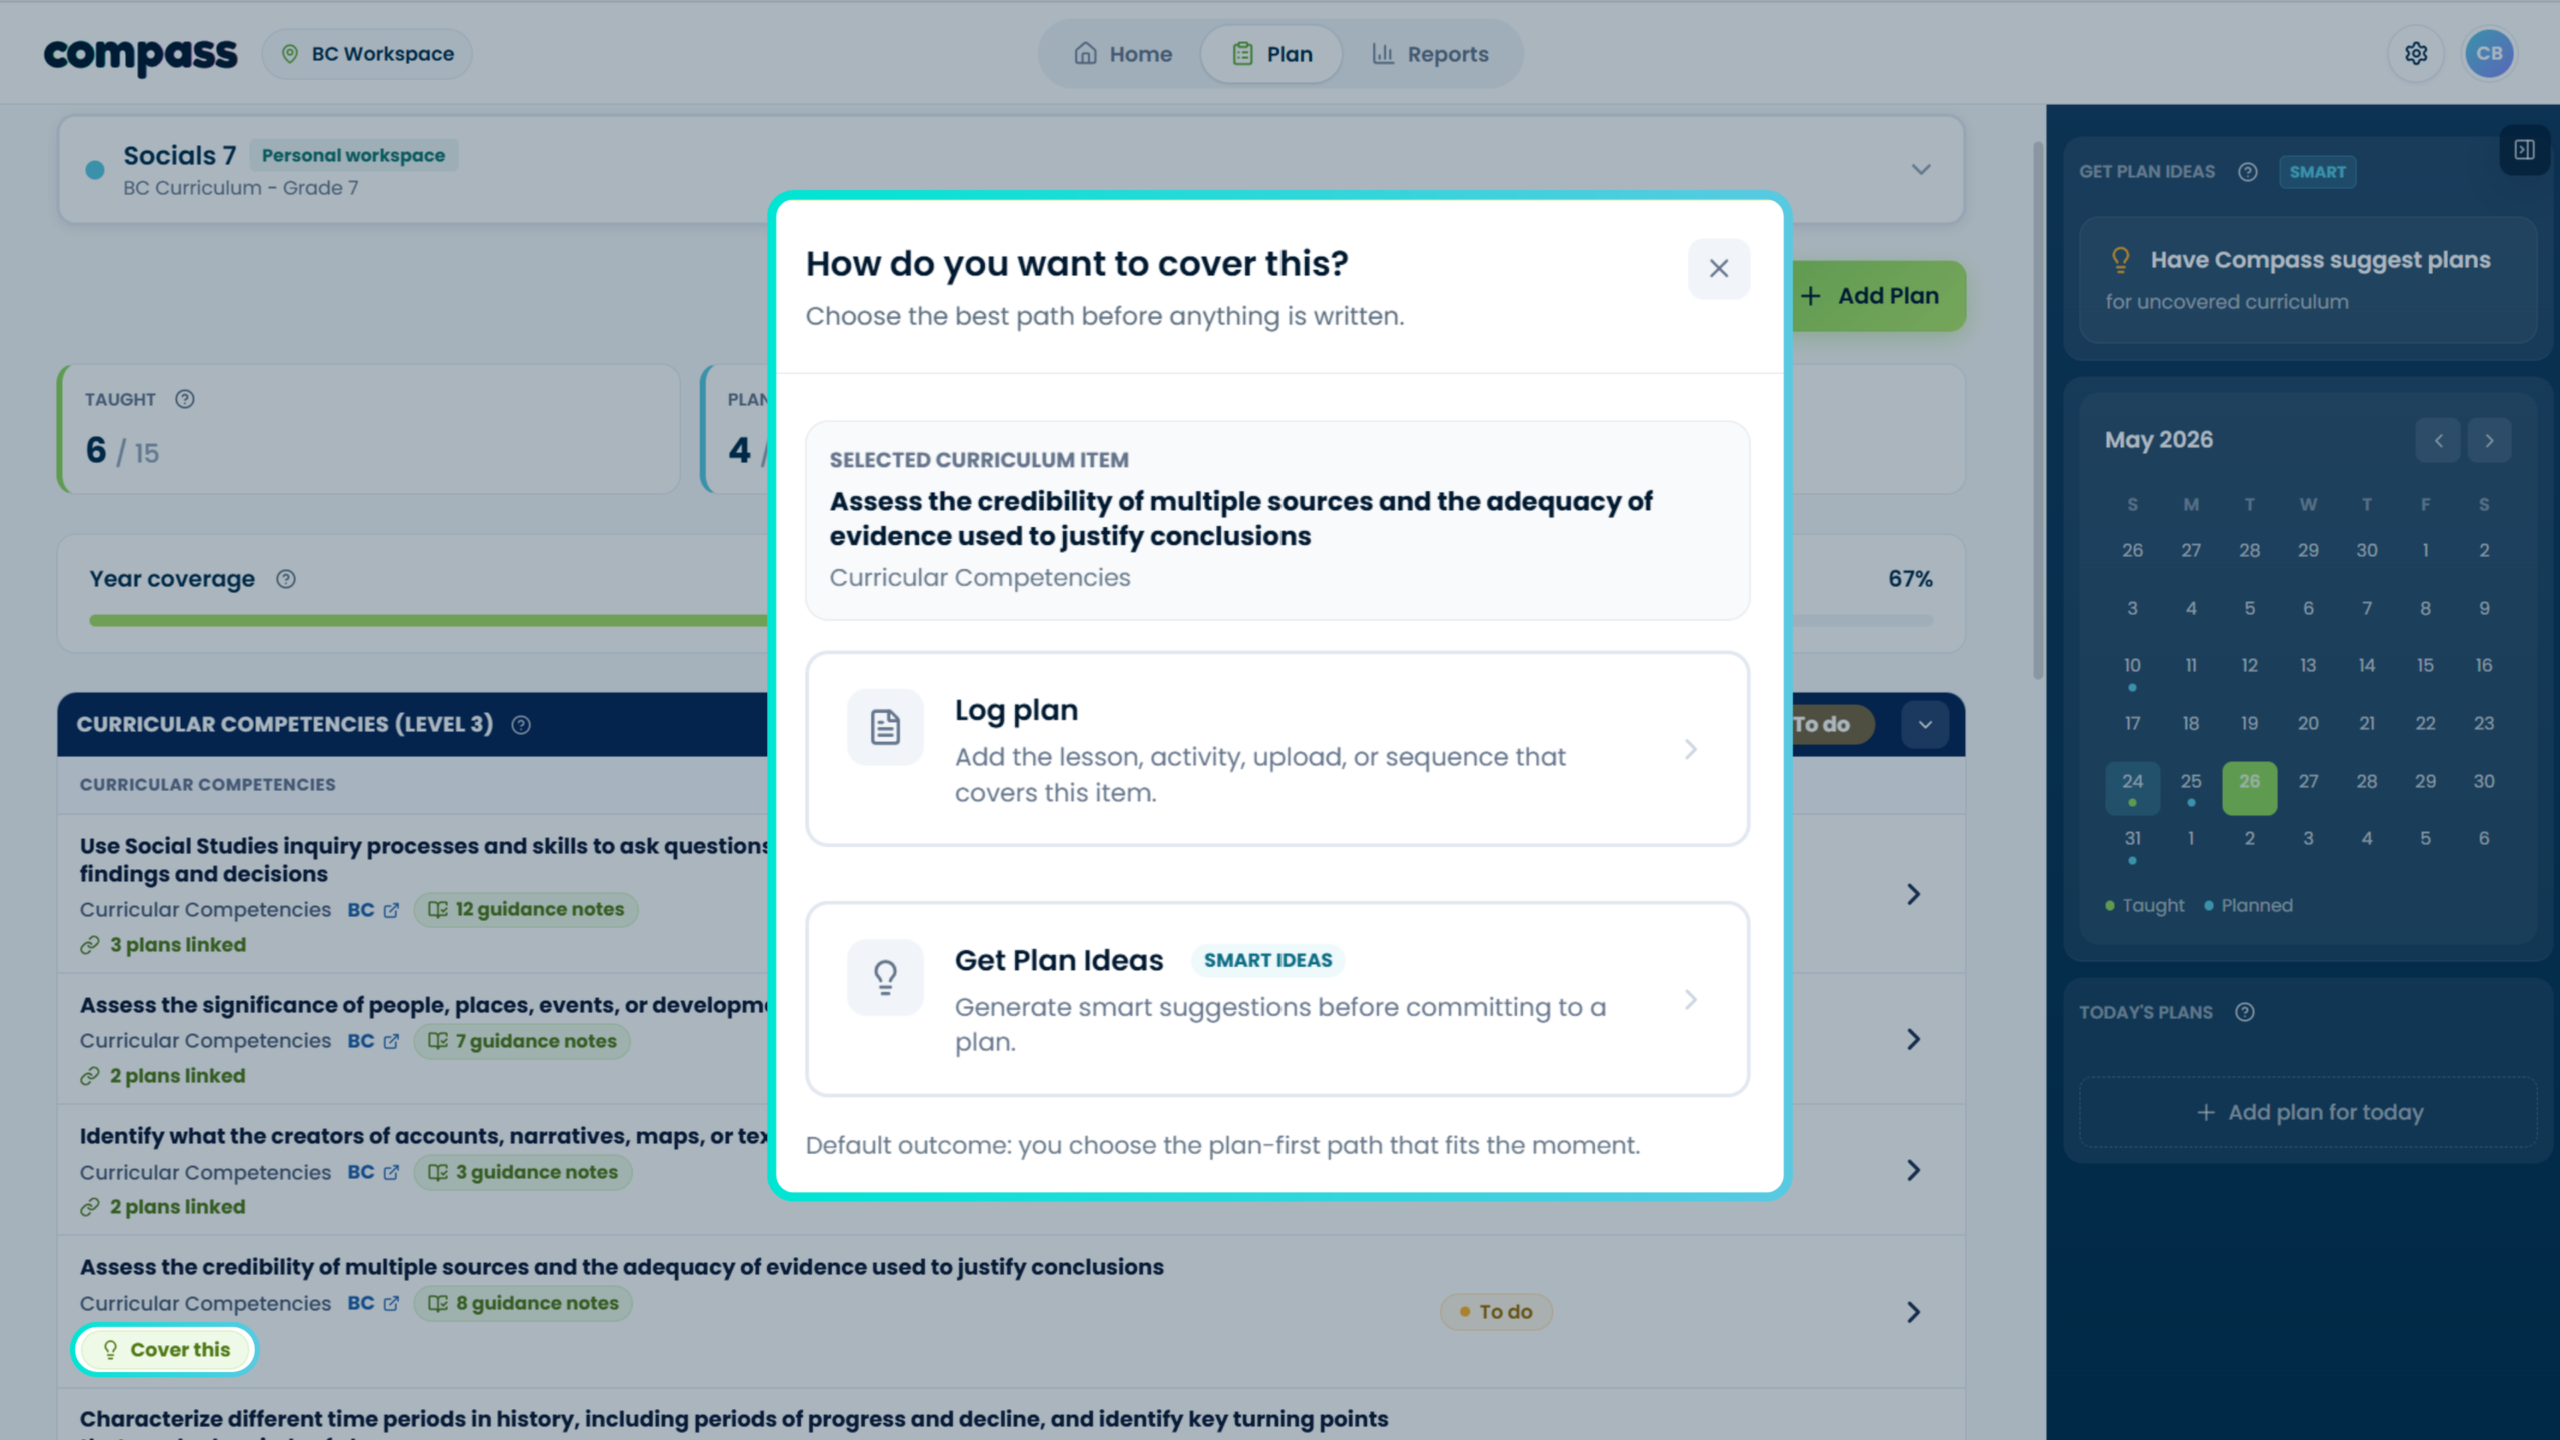
What is Cover This?
Cover This appears on uncovered curriculum items. Use it to log a plan for that item, or use Plan Ideas to have Compass suggest planning ideas connected to that curriculum need.
How do I find plans I’ve already added?
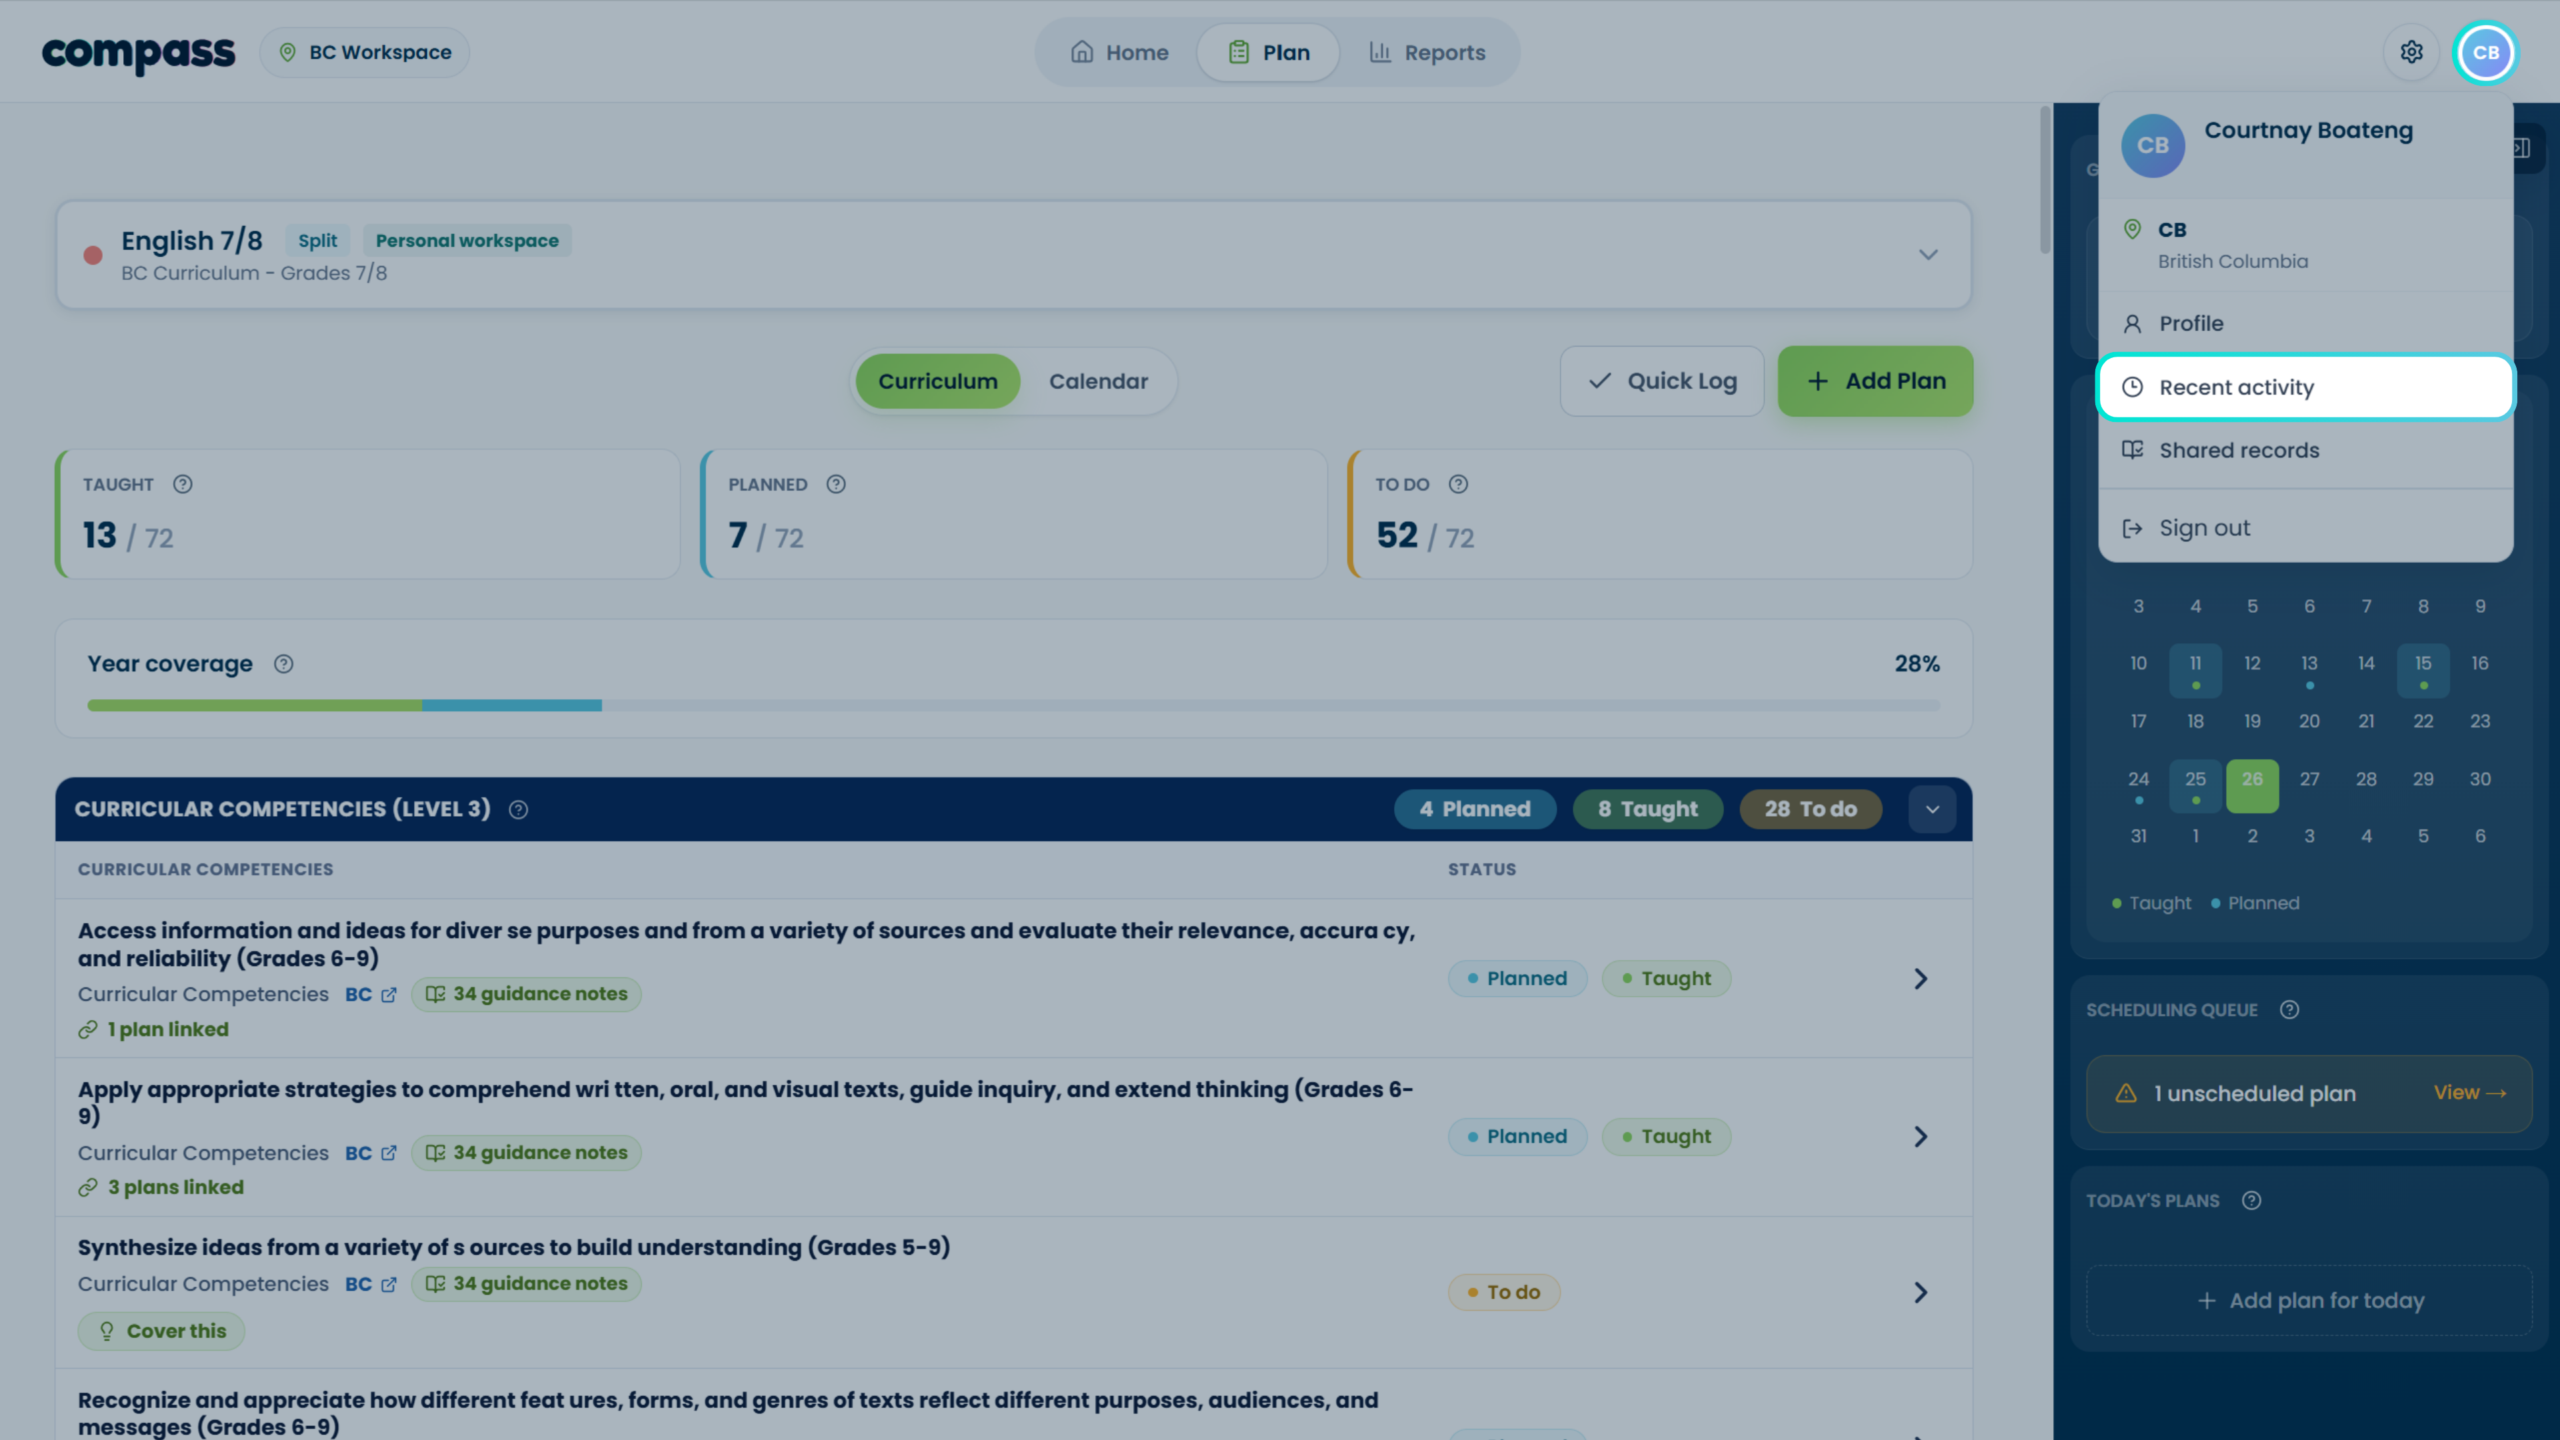
Use Recent Activity to review plans, logs, archived items, and coverage updates you have added to Compass.
Where to find it
- Open Recent Activity from the Home page or profile dropdown. This is the main place to review previous records.
- Look for the plan or log you need. Records may include manual entries, Quick Logs, uploaded scans, and saved-for-later items.
- Review the status and curriculum links. Check whether the record is Planned, Taught, Unscheduled, Archived, or Needs Review.
- Take action if needed. Depending on the final product flow, actions may include viewing details, editing, scheduling, archiving, restoring, or deleting.
Visual reference
Plus Features
3 guidesHow does Smart Scan work?
Smart Scan is a Plus feature that suggests curriculum matches from an uploaded plan or pasted text.
Basic steps
- Choose Upload Plan or Paste Text from Add Plan. Smart Scan is available through both paths.
- Compass scans the content. It compares the plan or pasted text against the curriculum items in the selected class or subject.
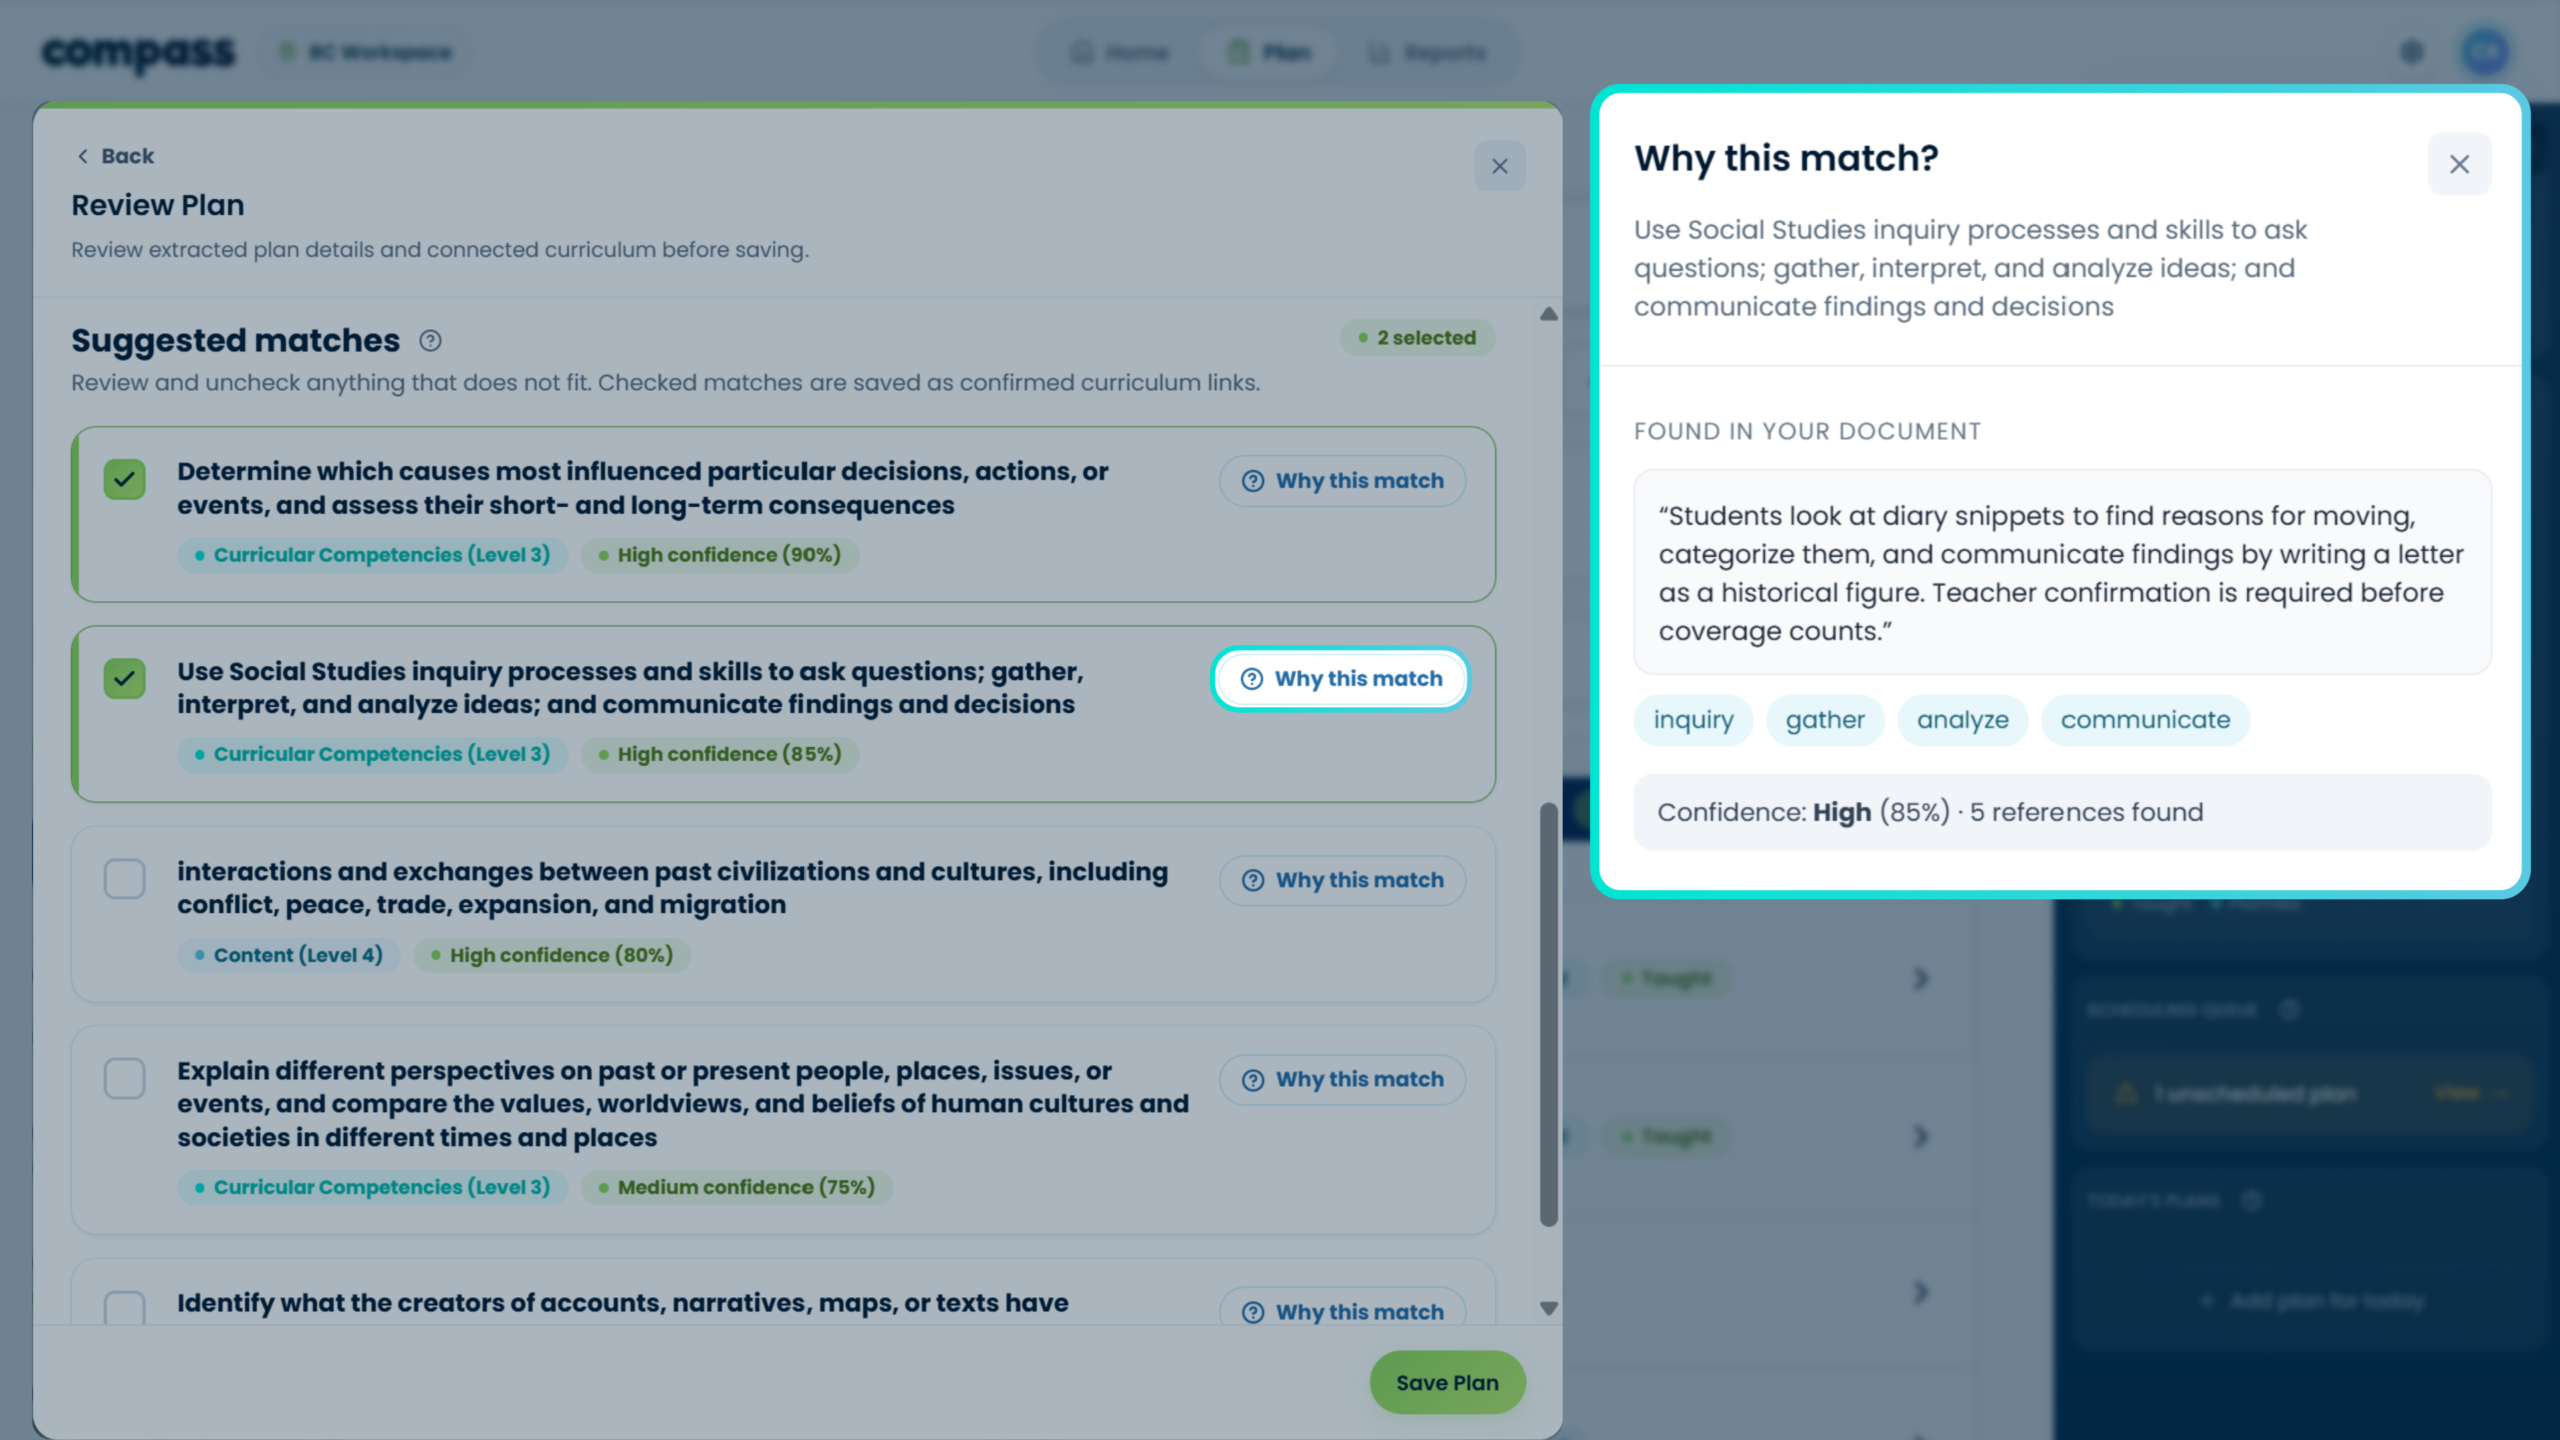
- Review the suggested matches. Teachers can check, uncheck, adjust, or add curriculum items manually.
- Use “Why this match?” when needed. This helps teachers understand why Compass suggested a particular curriculum connection.
- Confirm what counts. Suggestions do not update coverage until the teacher confirms them.
Visual walkthrough
Why this match?
How do I use Plan Ideas?
Plan Ideas helps teachers generate lightweight planning suggestions for uncovered curriculum items.
Where to open it
You can open Plan Ideas from Cover This on an uncovered curriculum item, or from the blue sidebar option where Compass can suggest plans.
Basic steps
- Select what you need to cover. If you opened Plan Ideas through Cover This, that curriculum item should already be selected.
- Review the suggestions. Compass shows lightweight planning ideas connected to the selected curriculum target.
- Check additional matches. Some ideas may also cover other curriculum items, which can help teachers plan more efficiently.
- Open details before saving. Review the topic, main goal, success indicators, and target curriculum.
- Save for later or schedule. Teachers decide whether an idea is useful and how it should enter their planning record.
Visual walkthrough
Screenshot reference

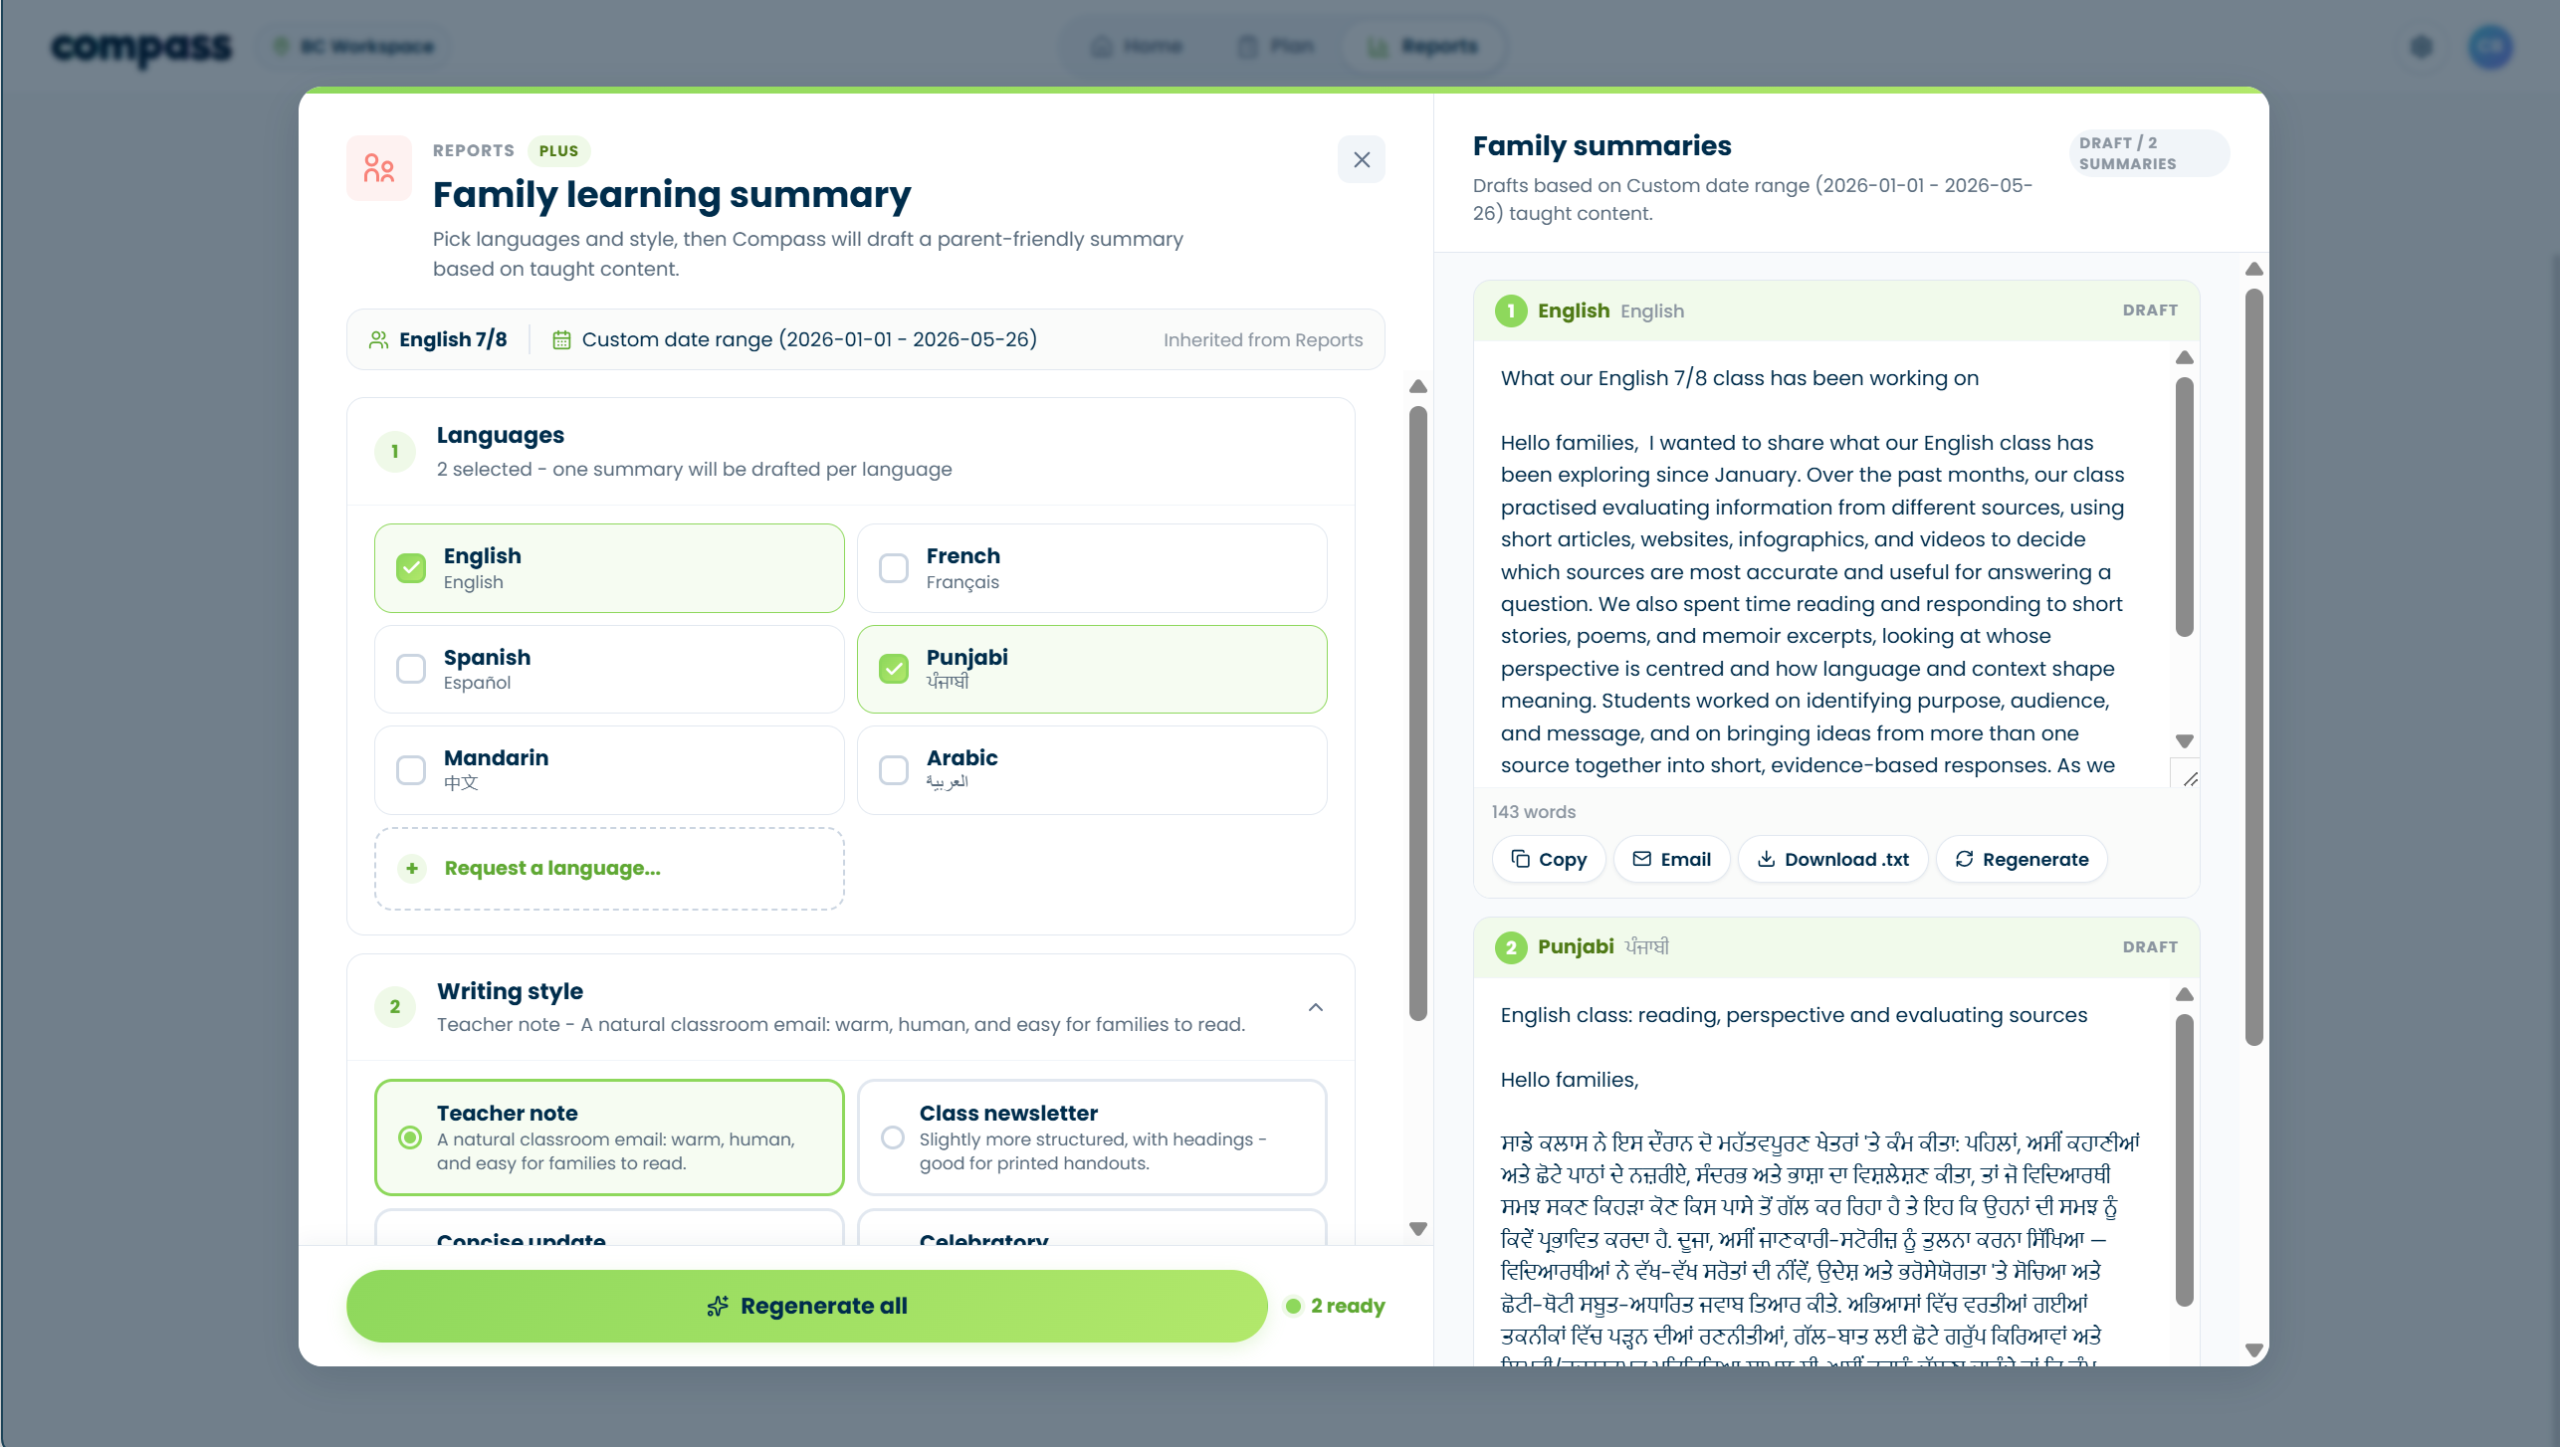
What reports are Plus-only?
Plus reports add AI-supported communication and reporting tools on top of the basic coverage reports.
Plus report options
Visual reference
Reports & Records
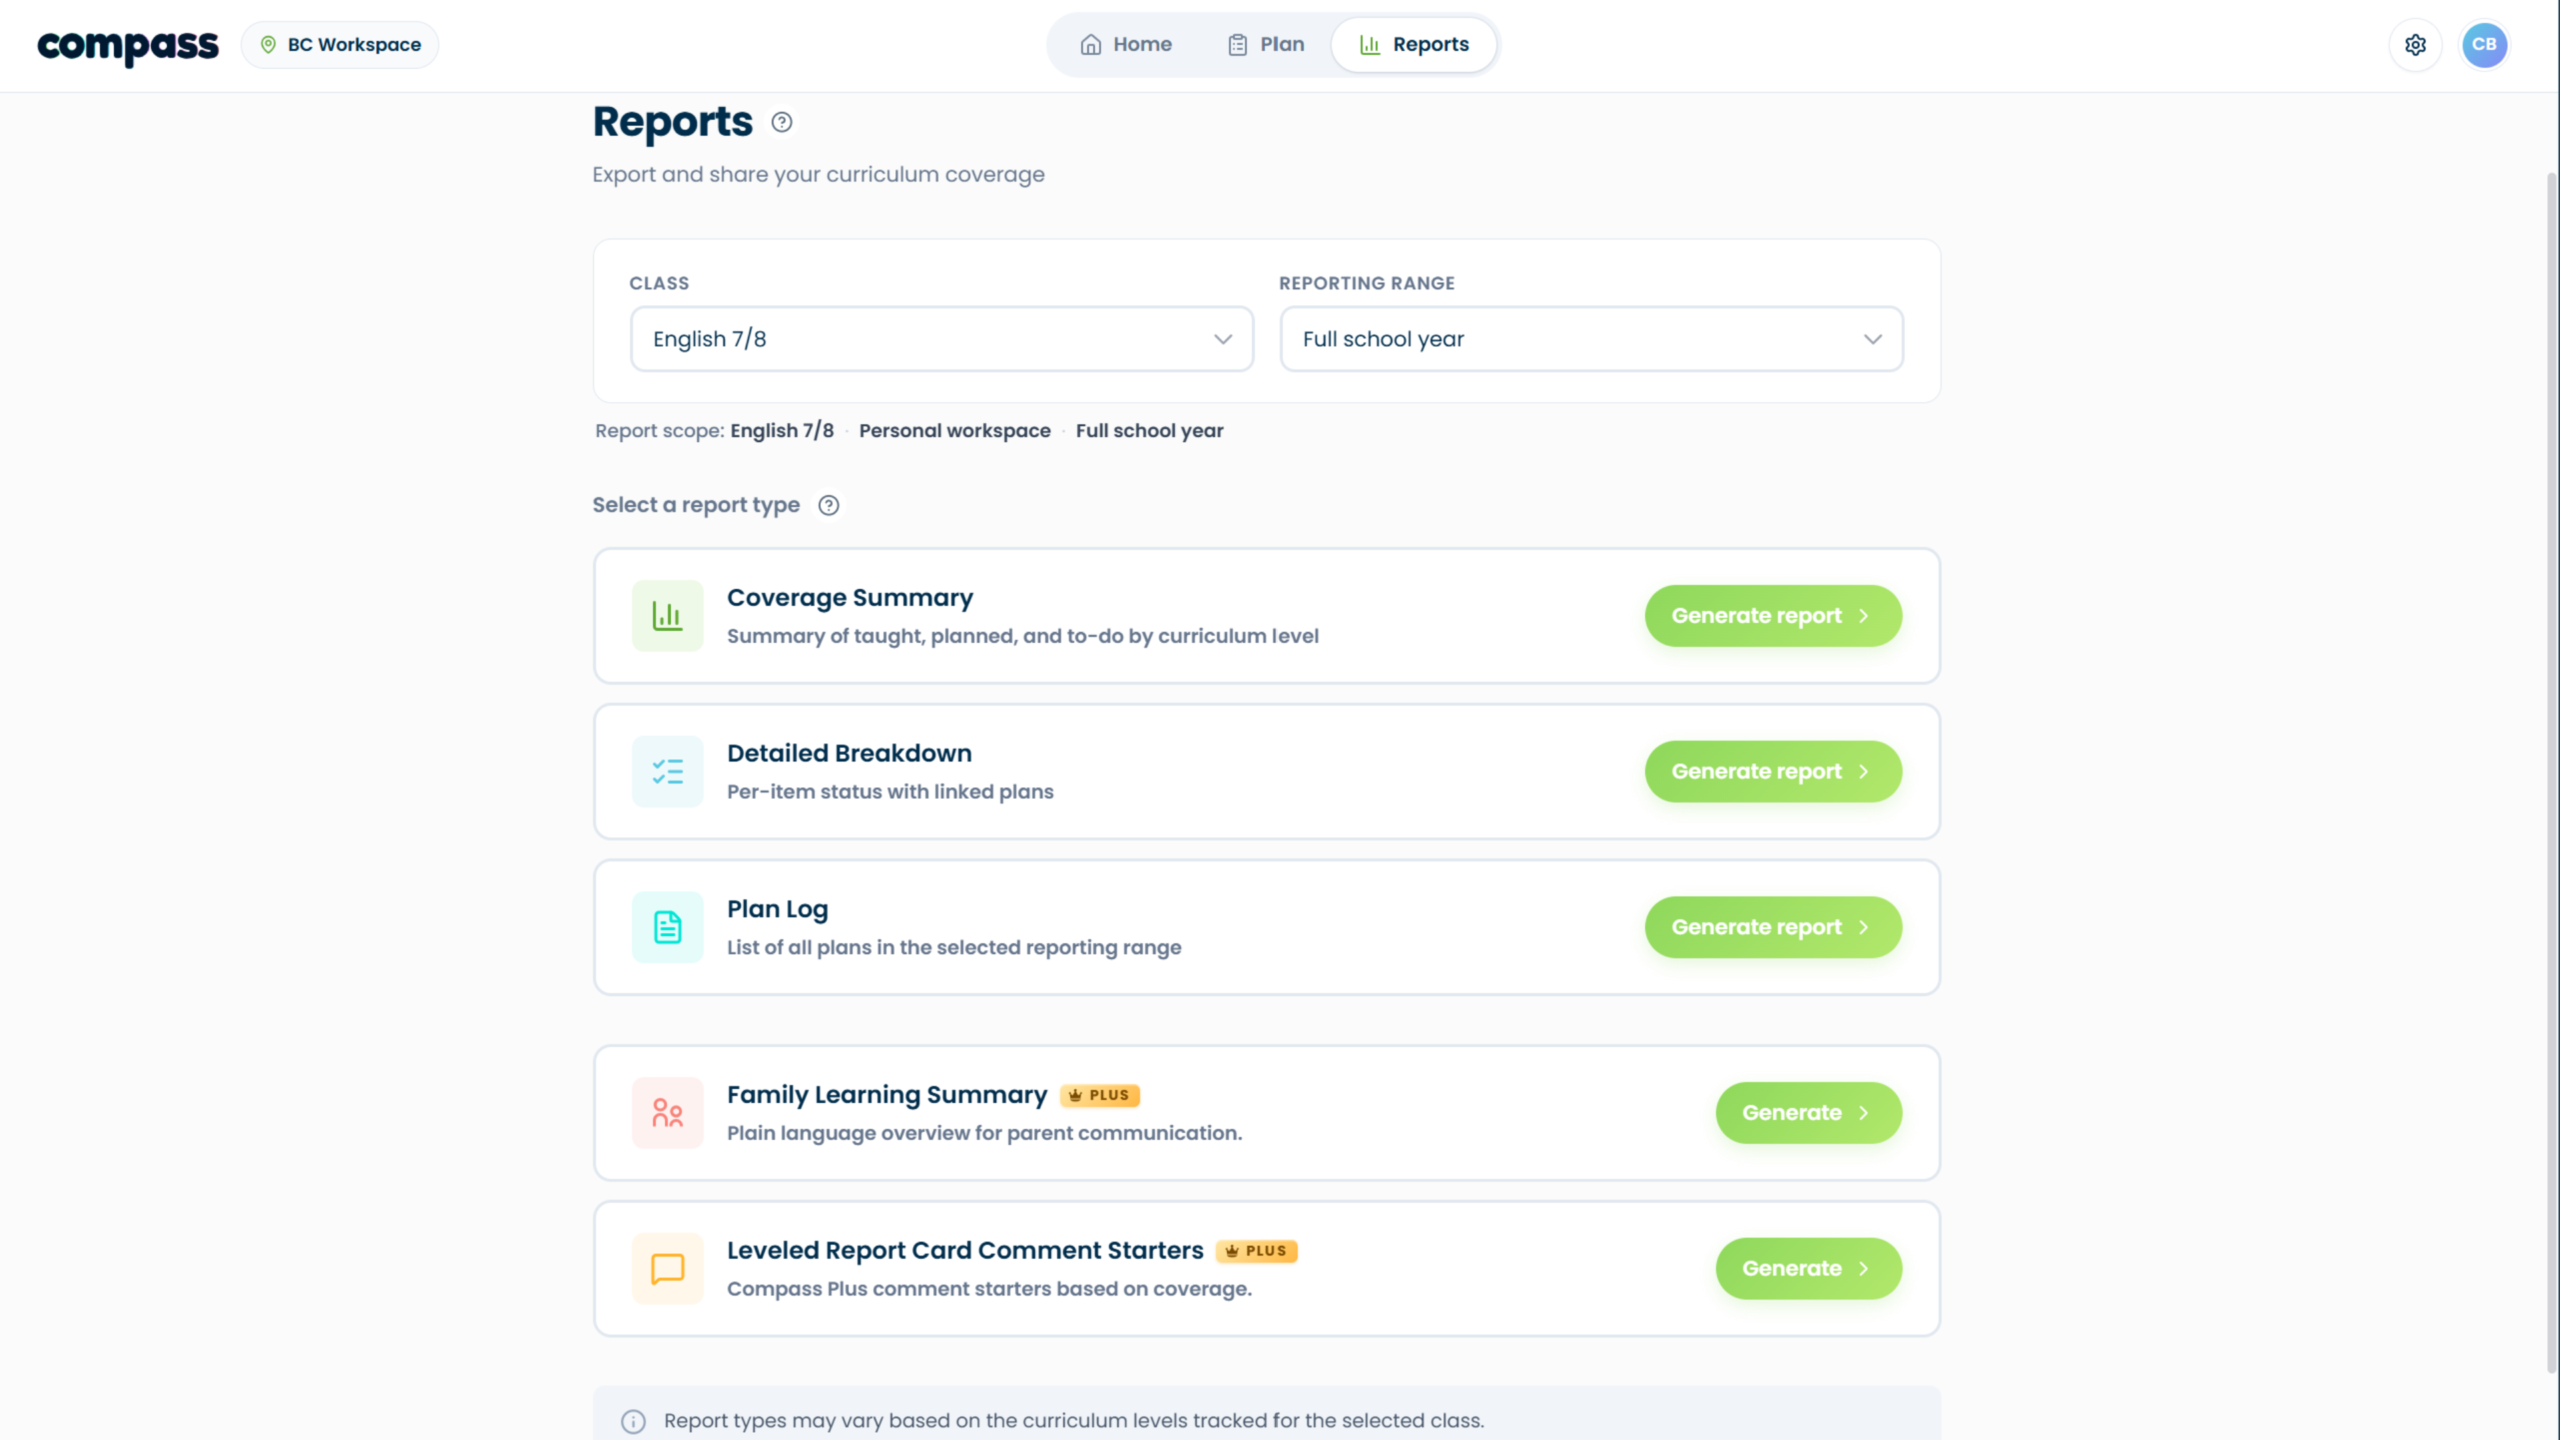
3 guidesHow do I generate reports?
The Reports page helps teachers create clean records of what has been planned, taught, or still needs attention.
Basic reports
Plus reports
Basic steps
- Open Reports. Choose the class and reporting range.
- Select a report type. Choose one of the basic reports or a Plus report.
- Generate and review. Use the report as a record or starting point, then review before sharing.
Visual reference
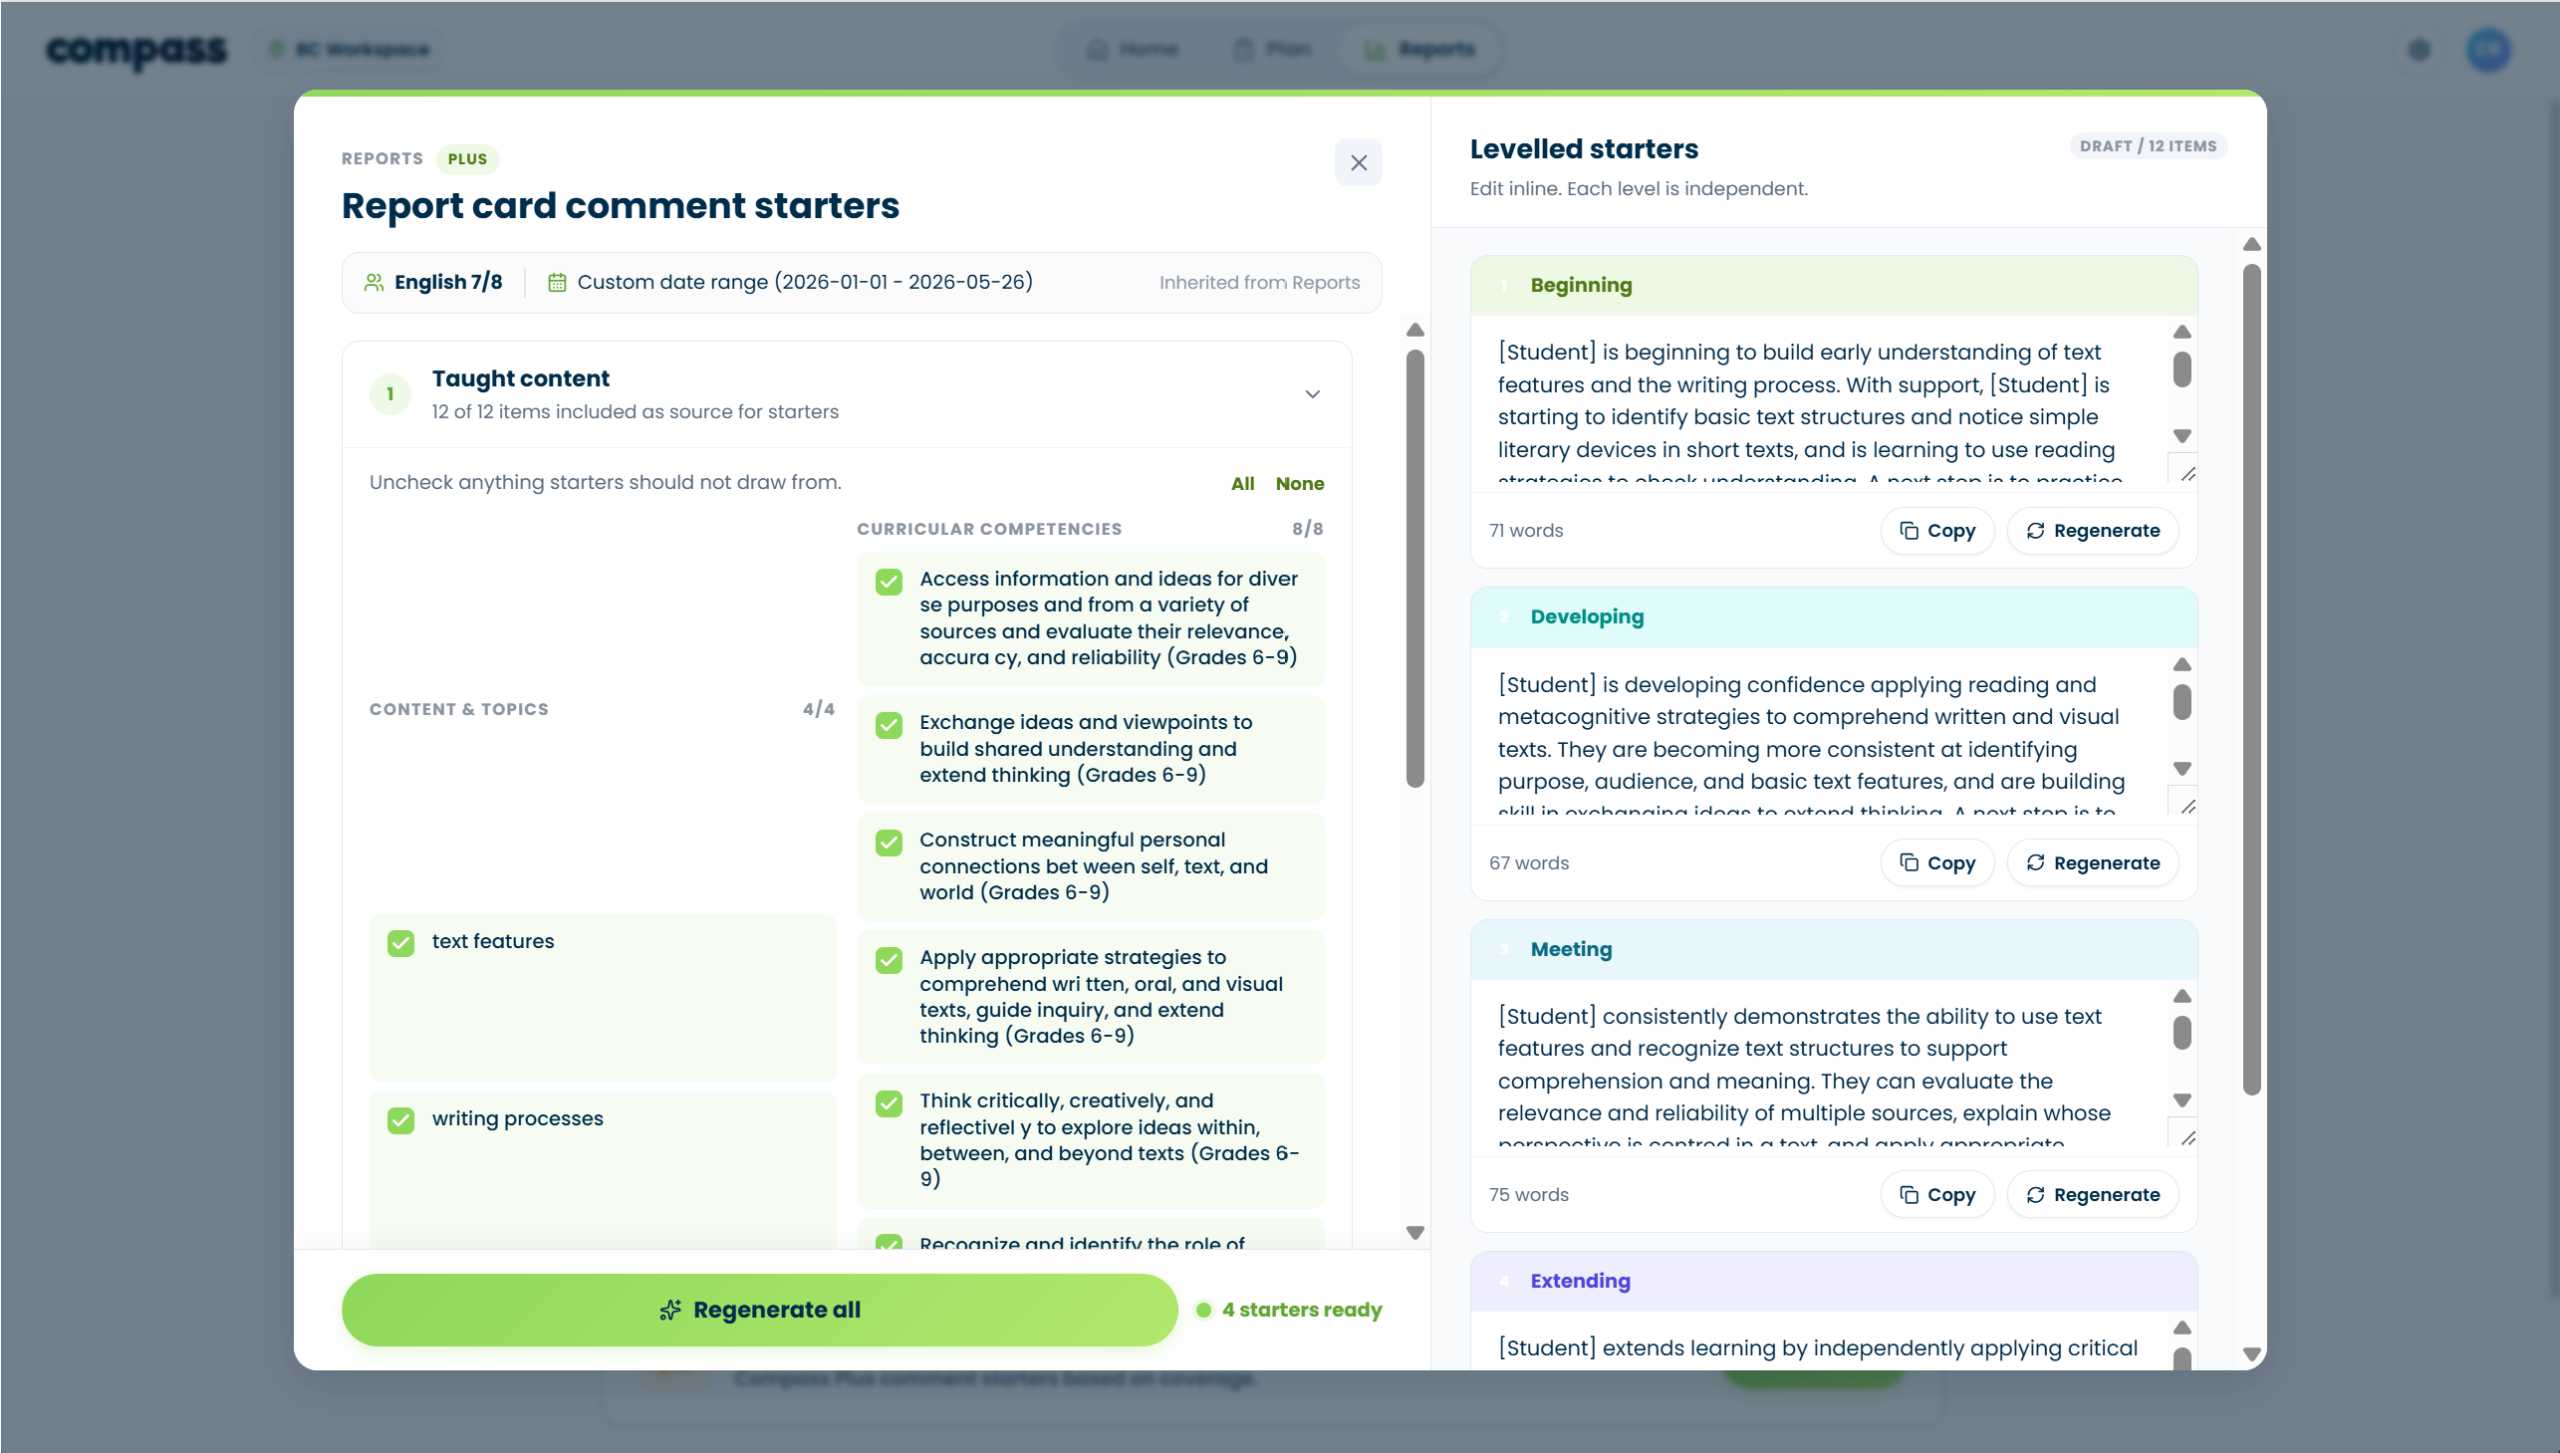
What are Comment Starters?
Leveled Report Card Comment Starters are general draft comments based on the content and curriculum covered in class.
Where do I find my records?
Your records are available through Recent Activity.
You can open Recent Activity from the profile dropdown or from the Home page. It shows the plans, logs, archived items, and coverage updates you have added to Compass.
Account & Privacy
2 guidesDoes Compass store my lesson files?
No. Compass does not store original lesson files. It may temporarily read uploaded or pasted content to suggest curriculum matches.
Who can see my data?
By default, your Compass planning data is for you. Class sharing is view-only for the person receiving the share link.
Sharing is not limited to Plus, but the person receiving the link cannot edit your workspace through that share.
Try searching for “Quick Log,” “Smart Scan,” “reports,” or “privacy.”
Still stuck?
Send us a note with what you were trying to do. A screenshot or short description helps us point you to the right resource faster.
